145 - MiTo   1.4 16v TJet   LPG INJECTOR ASSEMBLY SUPPORTING BRACKET - R.R.   1057B69   

Detail     Detail

Removing ( Refitting )

   Op. 1016A10 SOUND-PROOFING COVER - R.R


Enlarge the image


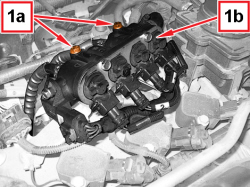
1. Undo the screws (1a) and move the LPG injector unit (1b) aside without disconnecting the electrical connections.


Enlarge the image


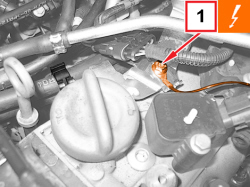
1. Undo the front screw fixing the LPG injector unit mounting bracket and remove the earth lead.


Enlarge the image


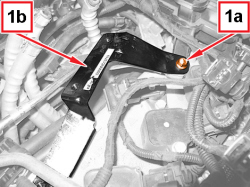
1. Undo the rear screw (1a) and remove the LPG injector unit mounting bracket (1b).

Refitting ( Removing )

- Place the LPG injector unit mounting bracket in its housing and tighten the rear screw to the prescribed torque.


Component


Fixing


dia


Value (daNm)


Validity


LPG injector assembly mounting bracket


Screw


M6


0.8 ÷ 1.0


1.4 16V TJet 120 HP

- Place the earth lead in position and tighten the front screw fixing the LPG injector unit mounting bracket.


Component


Fixing


dia


Value (daNm)


Validity


LPG injector assembly mounting bracket


Screw


M6


0.8 ÷ 1.0


1.4 16V TJet 120 HP


Enlarge the image


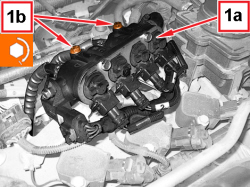
1. Place the LPG injector unit (1a) in position and tighten the screws (1b) to the prescribed torque.


Component


Fixing


dia


Value (daNm)


Validity


LPG injector assembly


Screw


M6


0.9 ÷ 1.1


1.4 16V TJet 120 HP

    Op. 1016A10 SOUND-PROOFING COVER - R.R

APPLIES TO VERSIONS WITH: Euro 5

Removing ( Refitting )

- Drain the section of pipe from the LPG pressure regulator to the injectors, following the procedure and the instructions given

   Op. 1043A02 LPG SYSTEM LINES PIPE DRAINING OPERATIONS

- Return the car to the workshop (in petrol operation mode).

APPLIES TO VERSIONS WITH: Euro 5

    Op. 1016A10 SOUND-PROOFING COVER - R.R

    Op. 1072B53 AIR CHAMBER REINFORCEMENT BRACKET - R.R.

    Op. 1057B66 GPL INJECTOR UNIT WITH CONNECTION PIPES TO PRESSURE REGULATOR R R

APPLIES TO VERSIONS WITH: Euro 5


Enlarge the image


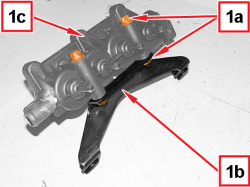
1. Working at the bench, undo the bolts (1a) and separate the bracket (1b) from the LPG injector unit (1c).

APPLIES TO VERSIONS WITH: Euro 5


Enlarge the image


Refitting ( Removing )

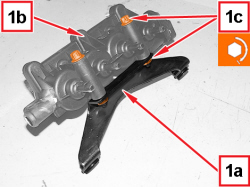
1. Place the bracket (1a) back in its housing on the LPG injector unit (1b) and tighten the bolts (1c) to the prescribed torque.

APPLIES TO VERSIONS WITH: Euro 5

    Op. 1057B66 GPL INJECTOR UNIT WITH CONNECTION PIPES TO PRESSURE REGULATOR R R

    Op. 1072B53 AIR CHAMBER REINFORCEMENT BRACKET - R.R.

    Op. 1016A10 SOUND-PROOFING COVER - R.R

    Op. 1043A04 GPL SYSTEM AND PIPES CHECK FOR LEAKS

APPLIES TO VERSIONS WITH: Euro 6

Removing ( Refitting )

- Drain the section of pipe from the LPG pressure regulator to the injectors, following the procedure and the instructions given

   Op. 1043A02 LPG SYSTEM LINES PIPE DRAINING OPERATIONS

- Return the car to the workshop (in petrol operation mode).

APPLIES TO VERSIONS WITH: Euro 6

    Op. 1016A10 SOUND-PROOFING COVER - R.R

    Op. 1072B53 AIR CHAMBER REINFORCEMENT BRACKET - R.R.

    Op. 1057B66 GPL INJECTOR UNIT WITH CONNECTION PIPES TO PRESSURE REGULATOR R R

APPLIES TO VERSIONS WITH: Euro 6


Enlarge the image


1. Working at the bench, undo the bolts (1a) and separate the bracket (1b) from the LPG injector unit (1c).

APPLIES TO VERSIONS WITH: Euro 6


Enlarge the image


Refitting ( Removing )

1. Place the bracket (1a) back in its housing on the LPG injector unit (1b) and tighten the bolts (1c) to the prescribed torque.

APPLIES TO VERSIONS WITH: Euro 6

    Op. 1057B66 GPL INJECTOR UNIT WITH CONNECTION PIPES TO PRESSURE REGULATOR R R

    Op. 1072B53 AIR CHAMBER REINFORCEMENT BRACKET - R.R.

    Op. 1016A10 SOUND-PROOFING COVER - R.R

    Op. 1043A04 GPL SYSTEM AND PIPES CHECK FOR LEAKS