
|
- In the event of LPG system component maintenance or replacement operations involving disconnection of the pipes, the section of the circuit involved must be bled following the instructions below.
|
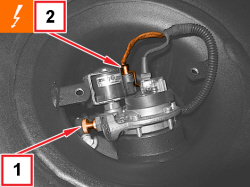

|
1. Close the LPG tank cock and bring the car outside the workshop, in a ventilated area, in LPG operating mode and keep it running until the LPG in the supply pipe runs out. When it switches to petrol, place the vehicle at a min. safety distance of 4 metres from other, vehicles and electrical systems/equipment, then stop the engine.

|
Wear the special helmet with visor and heavy-duty gloves meeting the UNI standards listed (see General Information - GROUP 10). Wear antistatic cotton clothing, to cover also lower and upper limbs.
Avoid synthetic clothing. Wear antistatic, spark-proof shoes.
|
2. Wait until the engine cools down and disconnect the electrical connection for the LPG intake solenoid valve.
|
|
|
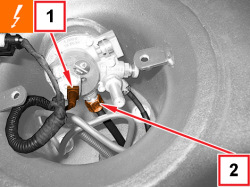
- In the event of operations on components of the section between filler and LPG tank, proceed as described below.
|
|
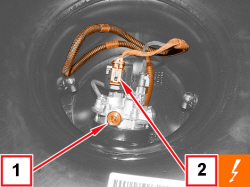
1. Disconnect the electrical connection for the LPG level gauge.
2. Partially unscrew the connector for the LPG filler pipe from filler to LPG tank, tank side.

|
Avoid coming into direct contact with the pressurised LPG in the pipe.
|
|
|
|
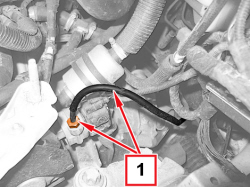
- In the event of operations on components of the section between tank and LPG pressure regulator, proceed as described below.
|
|
1. Partially unscrew the connector for the pipe from tank to LPG pressure regulator, pressure regulator side.
|
|
Avoid coming into direct contact with the pressurised LPG in the pipe.
|
|
|
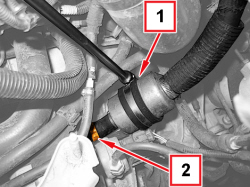
1. Undo the nut and release the LPG filter retaining band.
2. Loosen the band and disconnect the pipe from pressure regulator to LPG filter, regulator side.
|
|
Avoid coming into direct contact with the pressurised LPG in the pipe.
|
|
|
|
- Once the LPG has been drained from the section of the pipe concerned, wait for at least 5 minutes, then bring the car back into the workshop (in petrol operation mode) and proceed with the required removal operations.
|
APPLIES TO VERSIONS WITH: Euro 5
|
|
- In the event of LPG system component maintenance or replacement operations involving disconnection of the pipes, the section of the circuit involved must be bled following the instructions below.
|
|
APPLIES TO VERSIONS WITH: Euro 5
APPLIES TO VERSIONS WITH: Euro 5
|
1. Close the LPG tank cock and bring the car outside the workshop, in a ventilated area, in LPG operating mode and keep it running until the LPG in the supply pipe runs out. When it switches to petrol, place the vehicle at a min. safety distance of 4 metres from other, vehicles and electrical systems/equipment, then stop the engine.
|
|
Wear the special helmet with visor and heavy-duty gloves meeting the UNI standards listed (see General Information - GROUP 10). Wear antistatic cotton clothing, to cover also lower and upper limbs.
Avoid synthetic clothing. Wear antistatic, spark-proof shoes.
|
2. Wait until the engine cools down and disconnect the electrical connection for the LPG intake solenoid valve.
|
|
APPLIES TO VERSIONS WITH: Euro 5
|
|
- In the event of operations on components of the section between filler and LPG tank, proceed as described below.
|
|
APPLIES TO VERSIONS WITH: Euro 5
APPLIES TO VERSIONS WITH: Euro 5
|
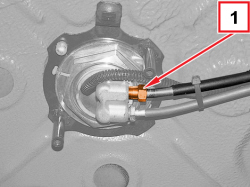
1. Partially unscrew the connector for the LPG filler pipe from filler to LPG tank, tank side.
|
|
Avoid coming into direct contact with the pressurised LPG in the pipe.
|
|
|
APPLIES TO VERSIONS WITH: Euro 5
|
|
- In the event of operations on components of the section between tank and LPG pressure regulator, proceed as described below.
|
|
APPLIES TO VERSIONS WITH: Euro 5
APPLIES TO VERSIONS WITH: Euro 5
|
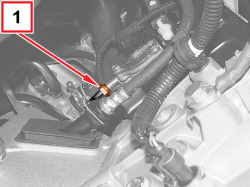
1. Partially unscrew the connector for the pipe from tank to LPG pressure regulator, pressure regulator side.
|
|
Avoid coming into direct contact with the pressurised LPG in the pipe.
|
|
|
APPLIES TO VERSIONS WITH: Euro 5
|
|
- In the event of operations on components of the section between pressure regulator and LPG injectors, proceed as described below.
|
|
APPLIES TO VERSIONS WITH: Euro 5
|
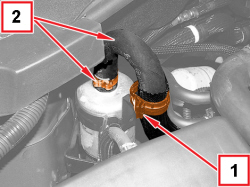
1. Open the retaining clip for the injector unit inlet pipe.
2. Loosen the band and disconnect the injector unit inlet pipe, LPG filter side.
|
|
Avoid coming into direct contact with the pressurised LPG in the pipe.
|
|
|
APPLIES TO VERSIONS WITH: Euro 5
|
|
- Once the LPG has been drained from the section of the pipe concerned, wait for at least 5 minutes, then bring the car back into the workshop (in petrol operation mode) and proceed with the required removal operations.
|
|
APPLIES TO VERSIONS WITH: Euro 6
|
|
- In the event of LPG system component maintenance or replacement operations involving disconnection of the pipes, the section of the circuit involved must be bled following the instructions below.
|
|
APPLIES TO VERSIONS WITH: Euro 6
APPLIES TO VERSIONS WITH: Euro 6
|
1. Close the LPG tank cock and bring the car outside the workshop, in a ventilated area, in LPG operating mode and keep it running until the LPG in the supply pipe runs out. When it switches to petrol, place the vehicle at a min. safety distance of 4 metres from other, vehicles and electrical systems/equipment, then stop the engine.
|
|
Wear the special helmet with visor and heavy-duty gloves meeting the UNI standards listed (see General Information - GROUP 10). Wear antistatic cotton clothing, to cover also lower and upper limbs.
Avoid synthetic clothing. Wear antistatic, spark-proof shoes.
|
2. Wait until the engine cools down and disconnect the electrical connection for the LPG intake solenoid valve.
|
|
APPLIES TO VERSIONS WITH: Euro 6
|
|
- In the event of operations on components of the section between filler and LPG tank, proceed as described below.
|
|
APPLIES TO VERSIONS WITH: Euro 6
APPLIES TO VERSIONS WITH: Euro 6
|
1. Partially unscrew the connector for the LPG filler pipe from filler to LPG tank, tank side.
|
|
Avoid coming into direct contact with the pressurised LPG in the pipe.
|
|
|
APPLIES TO VERSIONS WITH: Euro 6
|
|
- In the event of operations on components of the section between tank and LPG pressure regulator, proceed as described below.
|
|
APPLIES TO VERSIONS WITH: Euro 6
APPLIES TO VERSIONS WITH: Euro 6
|
1. Partially unscrew the connector for the pipe from tank to LPG pressure regulator, pressure regulator side.
|
|
Avoid coming into direct contact with the pressurised LPG in the pipe.
|
|
|
APPLIES TO VERSIONS WITH: Euro 6
|
|
- In the event of operations on components of the section between pressure regulator and LPG injectors, proceed as described below.
|
|
APPLIES TO VERSIONS WITH: Euro 6
|
1. Open the retaining clip for the injector unit inlet pipe.
2. Loosen the band and disconnect the injector unit inlet pipe, LPG filter side.
|
|
Avoid coming into direct contact with the pressurised LPG in the pipe.
|
|
|
APPLIES TO VERSIONS WITH: Euro 6
|
|
- Once the LPG has been drained from the section of the pipe concerned, wait for at least 5 minutes, then bring the car back into the workshop (in petrol operation mode) and proceed with the required removal operations.
|
|


