
 Removing
(
Refitting
Removing
(
Refitting )
)
- Raise the window until it is in the end of travel position.
Op. 5570T91 FRONT SIDE SPEAKER (ONE), LEFT OR RIGHT - R.R. WITH DOOR PANEL REMOVED
|
|
Removing
(
Refitting
)
- Raise the window until it is in the end of travel position. Op. 5570T91 FRONT SIDE SPEAKER (ONE), LEFT OR RIGHT - R.R. WITH DOOR PANEL REMOVED |
|
Op. 7005A04 FRONT SIDE DOOR WATER GUARD PROTECTION - R.R. OR ARRANGE WITH DOOR PANEL REMOVED |
|
Op. 7005D26 FRONT SIDE DOOR DESCENDING WINDOW GLASS SCRAPER (OUTER) (ONE), LEFT OR RIGHT- R.R |
|
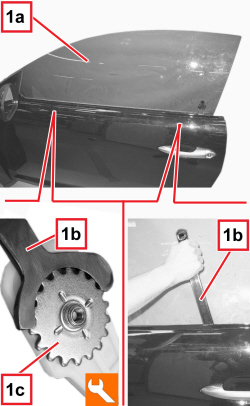  |
1. Working between the outside of the window (1a) and the door frame (outer glass scraper housing), using the special tool (1b) loosen the two toothed ring nuts (1c) for the window retainers.
|
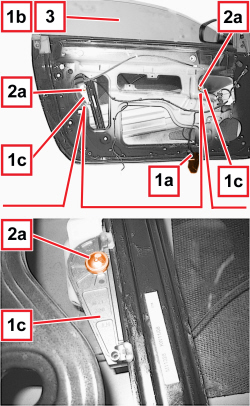  |
1. Provisionally connect the window switch unit to the electric connection (1a), then lower the window (1b) until the glass retainers (1c) are in an accessible position (as in the figure). 2. Loosen the screws (2a) securing the window and extract them.
3. Raise the glass and extract it. |
  |
Refitting
(
Removing
)
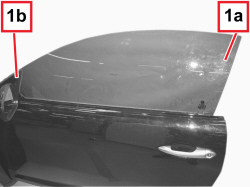
- Check the condition of the window. 1. Carefully fit the window (1a) in its housing and rest it on the two retainers, then push it forwards in the sliding seat (1b). |
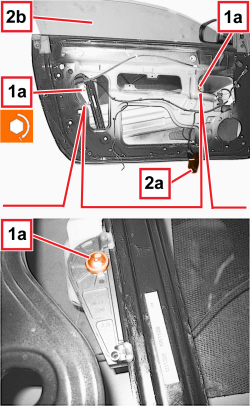  |
1. Tighten the screws (1a) fixing the window to the prescribed torque.
2. Provisionally connect the window opening switch unit to the electrical connection (2a), then raise the window (2b) until it is in the end of travel position. |
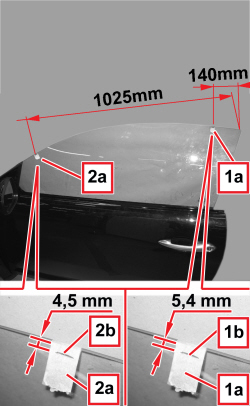  |
1. Fit adhesive tape (1a) to the upper edge of the window 140 mm away from the rear corner as illustrated. Mark a line (1b) on the outer edge of the adhesive tape, 5.4 mm from the upper edge of the window (distance of window recess in seal). 2. Fit adhesive tape (2a) to the upper edge of the window 1025 mm away from the rear corner as illustrated. Mark a line (2b) on the outer edge of the adhesive tape, 4.5 mm from the upper edge of the window (distance of window recess in seal). |
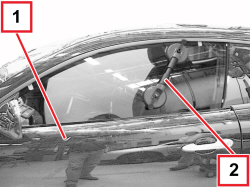  |
1. Close the door. 2. Apply a suction pad in the middle area of the window in order to be able to move it. |
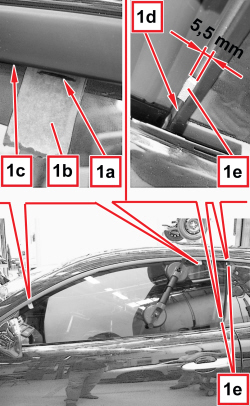  |
1. Move the window brining the lines (1a) on the adhesive tape (1b) in line with the edge (1c) of the upper seal and 5.5 mm from the edge (1d) of the rear seal. To facilitate the adjustment of the window, it is advisable to insert two 5.5 mm shims (1e) between the window and the rear seal edge as shown in the figure. |
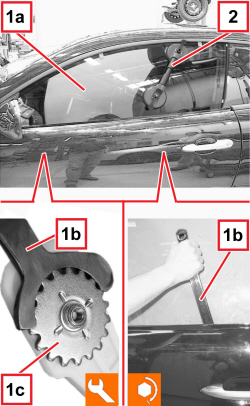  |
1. With the window adjusted as described above, working on the external side of the window (1a) and the door frame (external window scraper compartment), use the specific tool (1b) to tighten the two toothed rings (1c) of the window retainers at the specified torque.
2. Remove the suction pad. |
|
|
- Actuate the door a few times and check that the window is automatically opened when the door is opened and automatically closed after closing the door (short drop function). If necessary, carry out the initialization procedure to activate the short drop function. See descriptions 7005 PASSENGER COMPARTMENT FRONT SIDE DOORS |
|
|
Op. 7005D26 FRONT SIDE DOOR DESCENDING WINDOW GLASS SCRAPER (OUTER) (ONE), LEFT OR RIGHT- R.R |
|
Op. 7005A04 FRONT SIDE DOOR WATER GUARD PROTECTION - R.R. OR ARRANGE WITH DOOR PANEL REMOVED |
|
Op. 5570T91 FRONT SIDE SPEAKER (ONE), LEFT OR RIGHT - R.R. WITH DOOR PANEL REMOVED |
|
