APPLIES TO VERSIONS WITH:
APPLIES TO VERSIONS WITH:

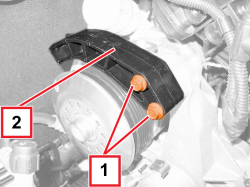

|
1. Unscrew the bolts.
2. Remove the compressor belt protection.
|
|
APPLIES TO VERSIONS WITH:
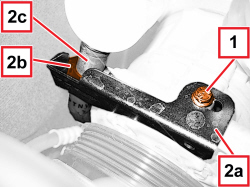
|
1. Unscrew the bolt.
2. Remove the bracket (2a) after having released the retaining clip (2b) from the tube (2c).
|
|
APPLIES TO VERSIONS WITH:
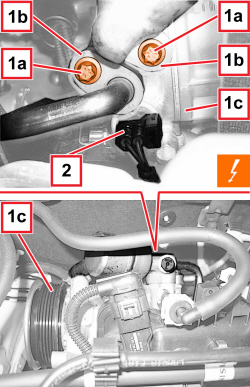
|
1. Undo the bolts (1a) and disconnect the pipe connectors (1b) from the compressor inlet and outlet pipes (1c) .

|
Seal the connectors that have been disconnected using suitable plugs to prevent dampness and impurities from entering the system.
|
2. Detach the electrical connection.
|
|
APPLIES TO VERSIONS WITH:
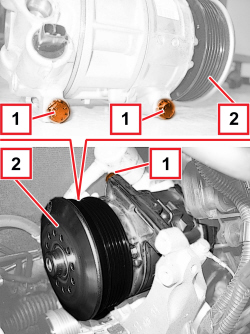
|
1. Undo the compressor fixing bolts.
2. Keep the compressor.
|
|
APPLIES TO VERSIONS WITH:
|
|

|
If the compressor is replaced, it is not necessary to remove and replace the fluid inside the compressor.
|
|
|
APPLIES TO VERSIONS WITH:
|
 Refitting
(
Removing Refitting
(
Removing )
)
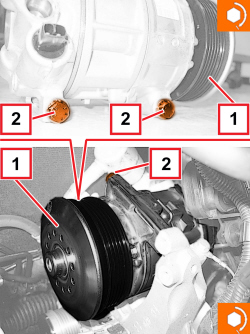
- Check that the compressor is not damaged. 1. Position the compressor. 2. Screw in the compressor fixing bolts and tighten them to the specified torque. |
|
Compressore |
Vite |
M10x125x100 |
2.3 ÷ 2.7 |
1.4 8v 1.4 16v TJet 1.4 16v |
|
|
APPLIES TO VERSIONS WITH:
|
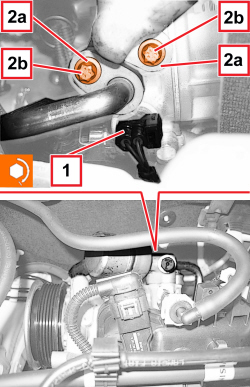
1. Connect the electrical connection for the compressor.
|
|
Replace the O-rings for the connectors. Only use green coloured seals that are resistant to R134A coolant. Lubricate the connector threads using anti-freeze.
|
2. Connect the compressor inlet and outlet pipe connectors (2a) to the compressor, then secure by tightening the screws (2c) to the specified torque.
|
Raccordo tubazione su compressore |
Vite |
M6 |
0.7 ÷ 1.0 |
1.4 16v TJet 1.4 16v 1.4 MultiAir 1.4 Turbo MultiAir |
|
|
APPLIES TO VERSIONS WITH:
APPLIES TO VERSIONS WITH: GPL, Euro 5, Euro 6,
APPLIES TO VERSIONS WITH: GPL, Euro 5, Euro 6,
|
1. Unscrew the bolts.
2. Remove the compressor belt protection.
|
|
APPLIES TO VERSIONS WITH: GPL, Euro 5, Euro 6,
|
1. Unscrew the bolt.
2. Remove the bracket (2a) after having released the retaining clip (2b) from the tube (2c).
|
|
APPLIES TO VERSIONS WITH: GPL, Euro 5, Euro 6,
|
1. Undo the screws (1a) and disconnect the connectors (1b) from the compressor inlet and outlet pipes (1c).
|
|
Seal the connectors that have been disconnected using suitable sealing plugs to prevent dampness and impurities from entering the system.
|
2. Detach the electrical connection.
|
|
APPLIES TO VERSIONS WITH: GPL, Euro 5, Euro 6,
|
1. Undo the compressor fixing bolts.
2. Recover the compressor.
|
|
APPLIES TO VERSIONS WITH: GPL, Euro 5, Euro 6,
|
|
|
|
If the compressor is replaced, it is not necessary to remove and replace the fluid inside the compressor.
|
|
|
APPLIES TO VERSIONS WITH: GPL, Euro 5, Euro 6,
|
Refitting
(
Removing
)
- Check that the compressor is not damaged. 1. Position the compressor. 2. Screw in the compressor fixing bolts and tighten them to the specified torque. |
|
Compressore |
Vite |
M10x125x100 |
2.3 ÷ 2.7 |
1.4 8v 1.4 16v TJet 1.4 16v |
|
|
APPLIES TO VERSIONS WITH: GPL, Euro 5, Euro 6,
|
1. Connect the electrical connection for the compressor.
|
|
Replace the O-rings on the connectors. Only use green coloured seals that are resistant to R134a coolant. Lubricate the connector threads using anti-freeze.
|
2. Connect the compressor inlet and outlet pipe connectors (2a) to the compressor, then secure by tightening the screws (2c) to the specified torque.
|
Raccordo tubazione su compressore |
Vite |
M6 |
0.7 ÷ 1.0 |
1.4 8v 1.4 16v TJet 1.4 16v 1.4 MultiAir 1.4 Turbo MultiAir |
|
|
APPLIES TO VERSIONS WITH: GPL, Euro 5, Euro 6,
APPLIES TO VERSIONS WITH:
APPLIES TO VERSIONS WITH:
|
1. Unscrew the bolts.
2. Remove the compressor belt protection.
|
|
APPLIES TO VERSIONS WITH:
|
1. Unscrew the bolt.
2. Remove the bracket (2a) after having released the retaining clip (2b) from the tube (2c).
|
|
APPLIES TO VERSIONS WITH:
|
1. Undo the bolts (1a) and disconnect the pipe connectors (1b) from the compressor inlet and outlet pipes (1c) .
|
|
Seal the connectors that have been disconnected using suitable plugs to prevent dampness and impurities from entering the system.
|
2. Detach the electrical connection.
|
|
APPLIES TO VERSIONS WITH:
|
1. Undo the compressor fixing bolts.
2. Keep the compressor.
|
|
APPLIES TO VERSIONS WITH:
|
|
|
|
If the compressor is replaced, it is not necessary to remove and replace the fluid inside the compressor.
|
|
|
APPLIES TO VERSIONS WITH:
|
Refitting
(
Removing
)
- Check that the compressor is not damaged. 1. Position the compressor. 2. Screw in the compressor fixing bolts and tighten them to the specified torque. |
|
Compressore |
Vite |
M10x125x100 |
2.3 ÷ 2.7 |
1.4 8v 1.4 16v TJet 1.4 16v |
|
|
APPLIES TO VERSIONS WITH:
|
1. Connect the electrical connection for the compressor.
2. Connect the compressor inlet and outlet pipe connectors (2a) to the compressor, then secure by tightening the screws (2c) to the specified torque.
|
Raccordo tubazione su compressore |
Vite |
M6 |
0.7 ÷ 1.0 |
1.4 16v TJet 1.4 16v 1.4 MultiAir 1.4 Turbo MultiAir |
|
|
APPLIES TO VERSIONS WITH:
APPLIES TO VERSIONS WITH: GPL, Euro 5, Euro 6,
APPLIES TO VERSIONS WITH: GPL, Euro 5, Euro 6,
|
1. Unscrew the bolts.
2. Remove the compressor belt protection.
|
|
APPLIES TO VERSIONS WITH: GPL, Euro 5, Euro 6,
|
1. Unscrew the bolt.
2. Remove the bracket (2a) after having released the retaining clip (2b) from the tube (2c).
|
|
APPLIES TO VERSIONS WITH: GPL, Euro 5, Euro 6,
|
1. Undo the screws (1a) and disconnect the connectors (1b) from the compressor inlet and outlet pipes (1c).
|
|
Seal the connectors that have been disconnected using suitable sealing plugs to prevent dampness and impurities from entering the system.
|
2. Detach the electrical connection.
|
|
APPLIES TO VERSIONS WITH: GPL, Euro 5, Euro 6,
|
1. Undo the compressor fixing bolts.
2. Recover the compressor.
|
|
APPLIES TO VERSIONS WITH: GPL, Euro 5, Euro 6,
|
|
|
|
If the compressor is replaced, it is not necessary to remove and replace the fluid inside the compressor.
|
|
|
APPLIES TO VERSIONS WITH: GPL, Euro 5, Euro 6,
|
Refitting
(
Removing
)
- Check that the compressor is not damaged. 1. Position the compressor. 2. Screw in the compressor fixing bolts and tighten them to the specified torque. |
|
Compressore |
Vite |
M10x125x100 |
2.3 ÷ 2.7 |
1.4 8v 1.4 16v TJet 1.4 16v |
|
|
APPLIES TO VERSIONS WITH: GPL, Euro 5, Euro 6,
|
1. Connect the electrical connection for the compressor.
2. Connect the compressor inlet and outlet pipe connectors (2a) to the compressor, then secure by tightening the screws (2c) to the specified torque.
|
Raccordo tubazione su compressore |
Vite |
M6 |
0.7 ÷ 1.0 |
1.4 8v 1.4 16v TJet 1.4 16v 1.4 MultiAir 1.4 Turbo MultiAir |
|
|
APPLIES TO VERSIONS WITH: GPL, Euro 5, Euro 6,


