145 - MiTo   1.4 16v TJet   SINGLE CYLINDER HEAD - DETACHED - OVERHAUL   1016E10   

Detail     Detail


Enlarge the image


Removing ( Refitting )

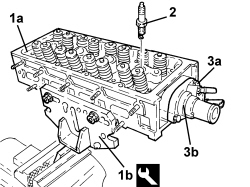
1. Position the cylinder head (1a) in the vice, supporting it using the support tool (1b).


Tool


Name


Function


Validity


1860470000


Support


Cylinder head overhaul


2. Unscrew the spark plugs and remove them.

3. Undo the screws (3a) and remove the thermostat (3b) complete with O-ring.

Enlarge the image


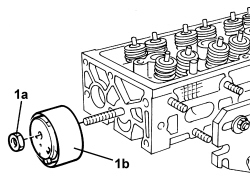
1. Undo the nut (1a) and remove the timing belt moving tensioner (1b).


Enlarge the image


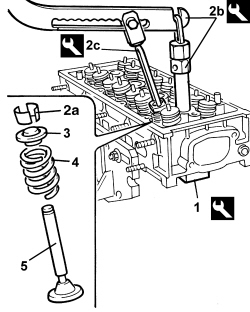
1. Fit the valve retaining tool beneath the cylinder head.


Tool


Name


Function


Validity


1860786000


Base


Valve retention


1.4 16v TJet

1.4 16v

1.4 MultiAir

1.4 Turbo MultiAir

2. Remove the half-cones (2a) using tools (2b) and (2c).


Tool


Name


Function


Validity


1860644000


Lever


Removing/refitting valves


Tool


Name


Function


Validity


1870890000


Chamber


Removing valves


1.4 8v

1.4 16v TJet

1.4 16v

1.4 MultiAir

1.4 Turbo MultiAir

3. Remove the upper valve shims.

4. Remove the valve springs.

5. Remove the valves.


Enlarge the image


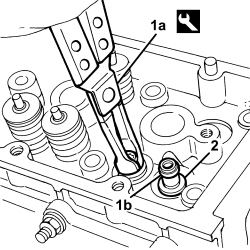
1. Use the tool (1a) to remove oil seal rings (1b) from the valve guides.


Tool


Name


Function


Validity


1870894000


Pliers


Oil seal extraction


0.9 TwinAir

1.4 16v TJet

1.4 16v

1.3 MultiJet

1.4 MultiAir

1.4 Turbo MultiAir

2. Remove the lower valve shims.

- Remove the valve retaining tool and keep the valves.

- Loosen the vice, remove the cylinder head and place it on the bench.

- Remove the cylinder head support tool.

    Op. 1016E14 VALVE GUIDES FOR SINGLE CYLINDER HEAD - REPLACE DURING OP.1016E10


Enlarge the image


Refitting ( Removing )

- Remove deposits and clean the valve seats and ducts.

- Clean any traces of the old gasket from the cylinder head lower surface.

- Check that the cylinder head surface flatness is within the prescribed values.


Measurement


Value


Validity


Engine cylinder head lower surface flatness (mm)


< 0.1


- If necessary, flatten the lower cylinder head surface; it is permitted to remove 0.1 mm of material from the minimum cylinder head height (factory value).


Measurement


Value


Validity


Cylinder head height (factory value) (mm)


77


1.4 16v TJet

1.4 16v

1.4 MultiAir

1.4 Turbo MultiAir

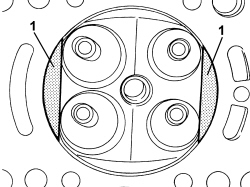
1. Check that the levelling has not changed any of the combustion chambers in the areas; otherwise the head must be replaced.


Enlarge the image


- Also check all the combustion chambers as follows:

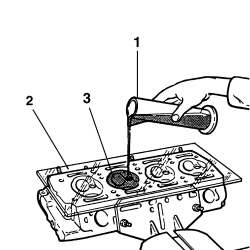
1. Fit the valves and spark plugs provisionally. Take a graduated burette containing a known amount of engine oil.

2. Rest a glass plate on the cylinder head with holes corresponding to the combustion chambers.

3. Fill the combustion chamber completely, taking care not to pour oil outside the combustion chamber.

- Wait about 10 minutes to allow the oil to decant.

- Measure the amount of oil remaining in the burette and then calculate the difference between this and the amount of oil used initially with the burette full. The difference is the volume of the chamber.

- Check that this value is within the specified values; if it is not, replace the cylinder head.


Measurement


Value


Validity


Combustion chamber volume (cc)


14.30


1.4 16v TJet

1.4 MultiAir

1.4 Turbo MultiAir

- Check that the valve stem does not show signs of grooves or seizing.

- Check that the diameter of the valve stems corresponds to the prescribed figures; if not, replace the worn valves.

- Check that the diameter of the valve head corresponds to the prescribed figures; if not, replace the valves.

- Check that the inner diameter of the valve guide and the clearance between it and the valve are within specified values, otherwise replace the valve guide.

- If necessary, replace the valve guides, refer to

    Op. 1016E14 VALVE GUIDES FOR SINGLE CYLINDER HEAD - REPLACE DURING OP.1016E10


Enlarge the image


- Using the special instrument, check that the valve spring specifications are within the prescribed values; if this is not the case, replace the components that do not comply.

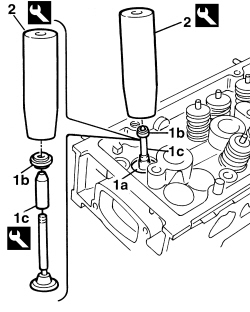
1. Fit the lower valve shims (1a); place the oil seal rings (1b) on the valve guides, placing the installing tool guide (1c) on the valve stem fitted provisionally in its seat, then fit a new oil seal ring on the installing tool.

2. Fit the oil seal ring in its housing using the fitting tool.


Tool


Name


Function


Validity


1860993000


Drift


Fitting valve guide oil seal ring


1.4 16v TJet

1.4 16v

1.4 MultiAir

1.4 Turbo MultiAir

- Refit the valves, springs, upper shims and half-cones using the same equipment as for the dismantling.

- Position the timing belt moving tensioner in its housing and secure it without tightening the nut.

- Place the thermostat in its housing with the new O-ring and secure it by tightening the screws to the prescribed torque.


Component


Fastening


Ø


Value (daNm)


Validity


Thermostat


Screw


M6


0.9 – 1.1


1.4 8v

1.4 16v TJet

1.4 16v

1.4 MultiAir

1.4 Turbo MultiAir

0.9 TwinAir

- Fit the spark plugs and tighten them to the prescribed torque.


Component


Fastening


Ø


Value (daNm)


Validity


Spark plugs


-


M12


1.6 – 2.0


1.4 16v TJet

1.4 8V

1.4 16v

1.4 MultiAir

1.4 Turbo MultiAir

0.9 TwinAir

- Undo the nuts and remove the cylinder head from the support tool.