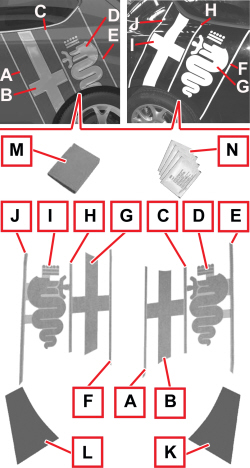
145 - MiTo   1.4 16v TJet   STYLIZED ADHESIVE STICKER ON THE REAR WING (ONE), LH OR RH - R. R.   7055C26   

Detail     Detail


Enlarge the image


Removing ( Refitting )

The removal of adhesives after a medium-long period could reveal slight colour differences in paint.

Adhesive removal and application must be made at ambient temperature, not lower than 18°C. In particular, to fit adhesives, the vehicle temperature should be stabilized, placing it in a shadow area (for a correct polymerization of the adhesive after sticking).

- The vehicle bodywork must be previously cleaned.

1. The sticker kit on the rear mudguard is formed by:

A: front adhesive strip for rear left mudguard

B: “cross” of the emblem for the rear left mudguard

C: centre adhesive strip for rear left mudguard

D: green serpent ("biscione") of the badge for the rear left mudguard

E: rear adhesive strip for rear left mudguard

F: front adhesive strip for rear right mudguard

G: green serpent ("biscione”) of the badge for the rear right mudguard

H: centre adhesive strip for rear right mudguard

I: “cross” of the badge for the rear right mudguard

J: rear adhesive strip for rear right mudguard

K: template for rear left mudguard

L: template for rear right mudguard

M: buffer for adhesive sticking

N: cloths to clean the bodywork area concerned with the adhesion procedure (dipped in suitable 3M product)

2. This procedure describes the removing/refitting of adhesives from the rear left mudguard.

The removing/refitting procedure for adhesives from the rear right mudguard is the same, but pay attention to reverse the assembly sequence of parts (G) and (I).

If a single adhesive is to be replaced, compare the colour shade of the adhesive to be fitted with the available ones. In case of shade differences, replace all adhesives.

For the fitting of the adhesives of the kit, a single operator is required.


Enlarge the image


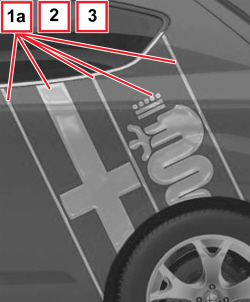
1. Heat the adhesives (1a) and the surrounding bodywork with a hot air blower.

2. Starting from one end, remove the stickers using a plastic spatula.

3. Remove the residual adhesive with a suitable product, such as 3M Cleaner Spray.


Enlarge the image


Refitting ( Removing )

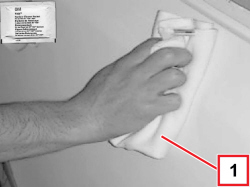
1. Clean the bodywork area where the stickers are to be fitted with the cloth included in the kit.

If the cloth is not included in the kit, clean the concerned bodywork area as follows.

- Thoroughly clean and degrease, with denatured ethyl alcohol or isopropyl alcohol, the bodywork area where the adhesive strip is to be applied.

- Wash the area with water then dry it.

- Clean the area using heptane.

The operations of refitting the adhesive strips should be carried out at a temperature of the bodywork/door bonding areas and the adhesive strips between 18 and 40°C (lower temperatures alter the polymerization of the adhesive with consequent deterioration of the adhesion). To increase the adhesion of the adhesive strips, preheat them at a temperature of 30-40°C; apply the adhesive strips immediately after they have been removed from the conditioning environment.


Enlarge the image


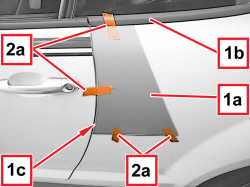
1. Place the template (1a) next to the weatherstrip (1b) of the fixed window and align it with the edge (1c) of the front door opening.

2. Fix the template (1a) in the correct location by a bodywork adhesive tape (2a).


Enlarge the image


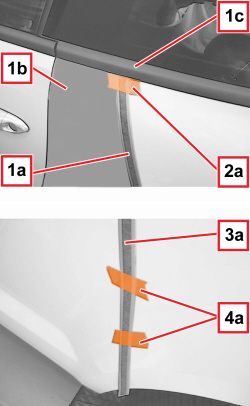
1. Place the upper section (1a) of the front adhesive strip touching the template (1b) and the weatherstrip (1c) of the fixed window.

2. Fix the adhesive strip (1a) in the correct location with a bodywork adhesive tape (2a).

3. Position the lower section (3a) of the front adhesive strip making it touch the mudguard surface.

4. Fix the adhesive trip (3a) in the correct location with a bodywork adhesive tape (4a).


Enlarge the image


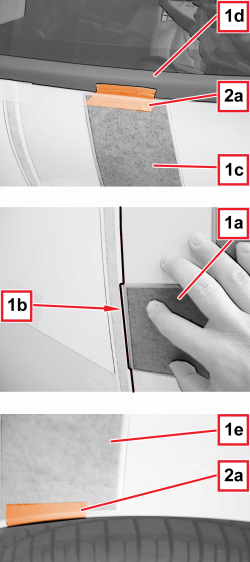
1. Position the "cross" of the badge (the green serpent - biscione - for the right mudguard) making the centre (1a) match with the reference (1b) of the front strip.

The upper section (1c) of the "cross" must touch the weatherstrip (1d) of the fixed window and the lower section (1e) must be flush to the wheel arch.

2. Fix the "cross" in the correct location by a bodywork adhesive tape (2a).


Enlarge the image


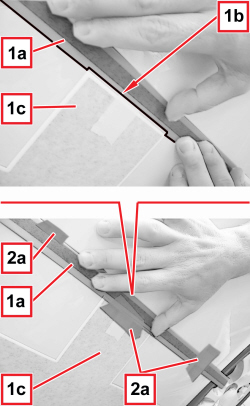
1. Position the centre strip (1a) making its reference (1b) match with the centre (1c) of the "cross".

Position the upper and lower parts of the adhesive strip (1a) sticking them on the mudguard surface.

2. Fix the adhesive strip in the correct location by a bodywork adhesive tape (2a).


Enlarge the image


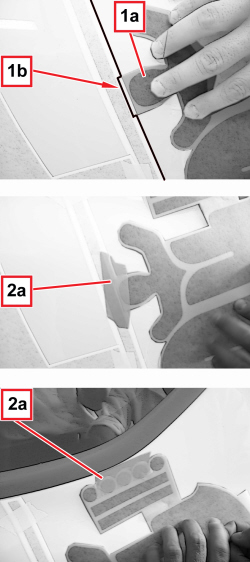
1. Position the "green serpent" (biscione) (the "cross" - for the right mudguard) making the centre (1a) match with the reference (1b) of the centre strip.

Position the other section of the green serpent ("biscione") making it adhere to the mudguard surface.

2. Fix the green serpent ("biscione") in the correct location by a bodywork adhesive tape (2a).


Enlarge the image


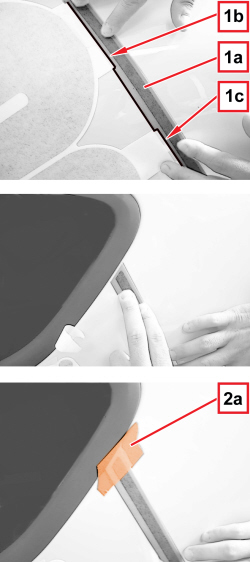
1. Position the rear adhesive strip (1a) making its references (1b) and (1c) match with the tabs of the green serpent (“biscione”).

Position the upper and lower parts of the rear adhesive strip sticking them on the mudguard surface.

2. Fix the rear adhesive strip in the correct location by a bodywork adhesive tape (2a).


Enlarge the image


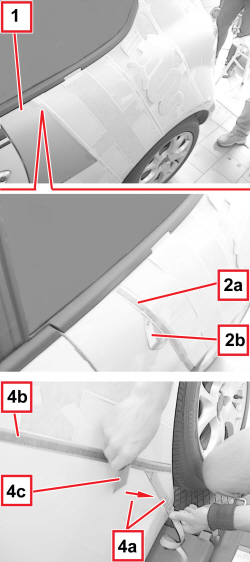
1. Remove the template.

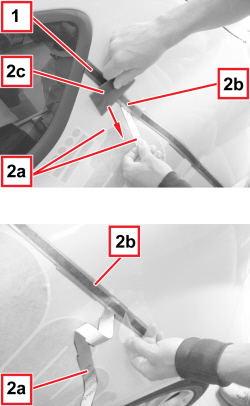
2. Lift the upper section (2a) of the front adhesive strip, then remove the lower protection film (2b).

After removing the protective films from the adhesive surfaces, do not touch these surfaces with the fingers or the hands.

3. Make the adhesive strip section (2a) adhere to the mudguard, paying attention not to create bubbles or folds (keep the strip tensioned a bit).

4. Progressively remove the lower protection film (4a) and make the adhesive strip (4b) adhere progressively, using the supplied buffer (4c).


Enlarge the image


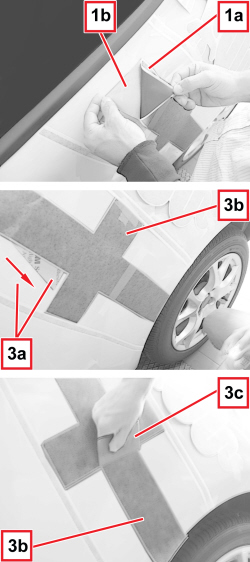
1. Lift the upper section (1a) of the "cross" and remove the lower protecting film (1b).

2. Make the upper section of the "cross" (1a) adhere to the mudguard, paying attention not to create bubbles or folds (keep the adhesive strip tensioned a bit).

3. Progressively remove the lower protection film (3a) and make the "cross" (3b) adhere progressively, in the middle, using the supplied buffer (3c).


Enlarge the image


1. Lift the upper section (1a) of the centre adhesive strip, then remove the lower protection film (1b).

2. Make the adhesive strip upper section (1a) adhere to the mudguard, paying attention not to create bubbles or folds (keep the adhesive strip tensioned a bit).

3. Progressively remove the lower protection film (3a) and make the adhesive strip (3b) adhere progressively, using the supplied buffer (3c).


Enlarge the image


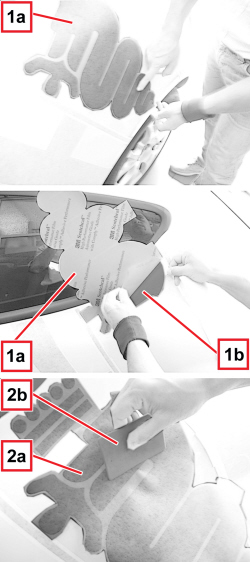
1. Lift the other section (1a) of the green serpent ("biscione"), then remove the lower protecting film (1b).

2. Make the adhesive section (2a) of the green serpent ("biscione") adhere to the mudguard, using the supplied buffer (2b) paying attention not to create bubbles or folds (keep the adhesive strip tensioned a bit).


Enlarge the image


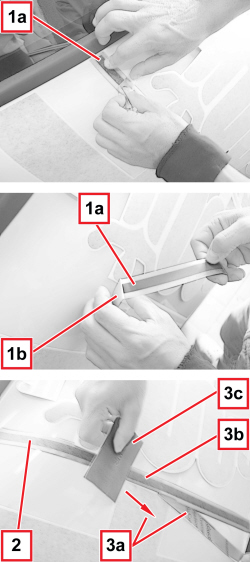
1. Lift the upper section of the rear adhesive strip, then remove the lower protection film.

Make the adhesive strip section adhere to the mudguard, paying attention not to create bubbles or folds (keep the adhesive strip tensioned a bit).

2. Progressively remove the lower protection film (2a) and make the adhesive strip (2b) adhere progressively, using the supplied buffer (2c).


Enlarge the image


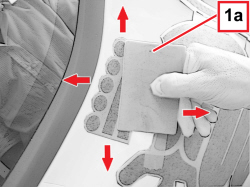
- Using the supplied buffer (1a), make all the adhesives on the mudguard adhere fully, working gently from the middle towards the outside, as shown by the arrows (so that air can come out without creating any bubbles).

Exert a higher pressure on the sticker perimeter.


Enlarge the image


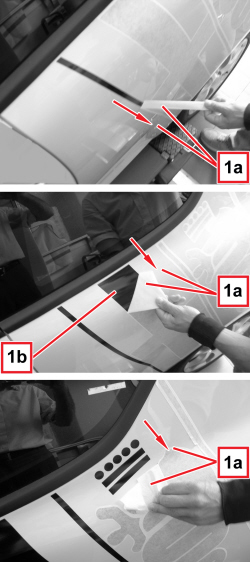
1. Gently remove the upper protection film (1a) from all the stickers on the mudguard.

The upper protecting film (1a) must be removed by pulling it in its position folded, as shown in the figure, not to cause the removal of the adhesives (1b) as well.


Enlarge the image


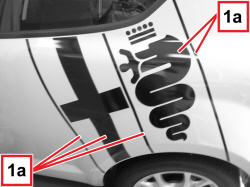
1. Check the correct adhesion of the all the adhesives (1a); make sure there are no air bubbles and remove them, if required, acting cautiously and gently with the supplied brush.

During the first four hours after the application of the adhesives, keep the vehicle:

- at a standstill

- at a minimum ambient temperature of 18°C

- sheltered from bad weather and sun

In the following 48 hours:

- do not expose the vehicle to sudden temperature changes

- do not wash the vehicle