145 - MiTo   1.4 16v TJet   FIXED REAR SIDE WINDOW (ONE) LEFT OR RIGHT - R.R INCLUDES CLEANING HOUSING   7035C14   

Detail     Detail


Enlarge the image


Removing ( Refitting )

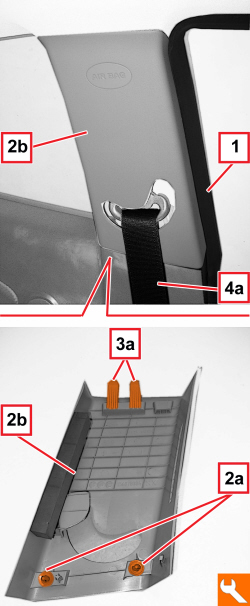
1. Release the door housing seal in the area of the centre pillar upper cover.

2. Release the lower inner retainers (2a) for the cover (2b) using the special tool.


Tool


Name


Function


Validity


1823015000


Knife


Retainer removal


3. Release the upper inner retainers (3a) and detach the trim (2b).

4. Lower the trim (2b) without releasing it from the seat belt (4a).


Enlarge the image


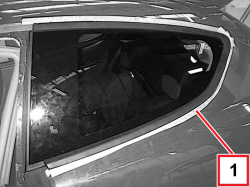
- Protect the interior vehicle parts using an appropriate cover.

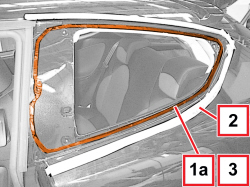
1. Apply a double layer of adhesive tape to the body along the upper, rear and lower edges of the window.


Enlarge the image


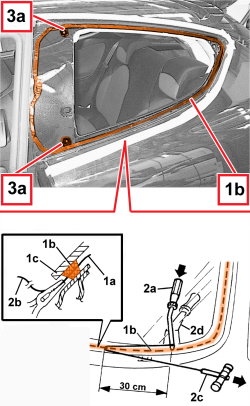
- The fixed window sealant can be cut using piano wire or a vibrating knife; both methods are described below.

- To cut using piano wire, proceed as described below.

1. Cut a length of piano wire of about 80 cm, then use pliers to introduce one end (1a) of the wire through the strip of sealant (1b) securing the fixed window (1c).

2. Fasten one end (1a) of the wire to the special retaining tool (2a) located inside the vehicle.

Fasten one end (2b) of the wire to the traction handle (2c) located outside the vehicle.

3. The mechanic inside the vehicle should keep the end of the tool (2a) on the bead of sealant (1b) about 30 cm from the point where the wire passes through.

The other mechanic, outside the vehicle, should pull the handle (2c) following the surround of the fixed window and they should cut the bead of sealant (1b).

When necessary, position a spatula (2d) by the tool (2a) to protect the inner parts of the vehicle.

Repeat the operation in sections of about 30 cm until the bead of sealant (1b) is completely cut.

Take care over the plastic centering pins (3a) during the cutting stage.


Enlarge the image


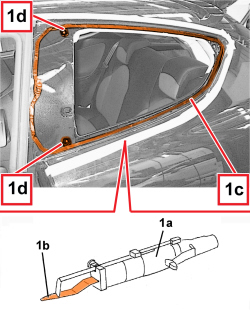
- To cut using a vibrating knife, proceed as described below.

1. Use the vibrating knife (1a) and blade (1b).

Cut the sealant (1c) along the entire perimeter of the window, working from the outside of the vehicle for the front and from the inside of the vehicle for the rest of the perimeter.

Take care over the plastic centering pins (1d) during the cutting stage.


Enlarge the image


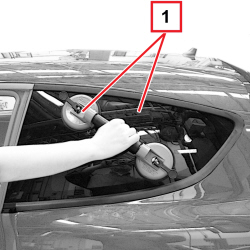
1. Fit suction pads on the window and, after having cut the entire length of sealant, remove the actual window and rest it on a support.


Enlarge the image


Refitting ( Removing )

1. Using suitable equipment, cut and level the bead of sealant (1a) in the window housing leaving a thickness of between 0.25 and 1 mm, taking care not to scratch the paintwork. The thickness of the sealant remaining in the housing will act as a support for the new bonding.

2. Remove the adhesive tape from the edges of the bodywork.

3. Thoroughly clean the window housing using an air jet and degrease the area involved in the bonding fully using heptane.

When bonding, 60 minutes after the bead of sealant has been cut and levelled, the surface of the actual sealant must be treated using the special activating product and it is necessary to wait for 15 minutes before fitting the windscreen.


Component


Type


Name


Classification


Q.ty


Validity


GLASS HOUSING


Activator for PUR


-


-


- If necessary, touch up the paintwork.


Enlarge the image


The removed window cannot be reused.

New window preparation.

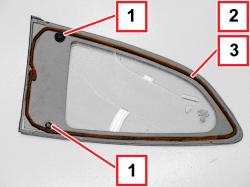
1. Check that the centering pins are okay.

2. Degrease the serigraphed perimeter of the new window glass involved in the bonding area using heptane.

3. Apply the glass adhesion promoter (primer) to the entire serigraphed perimeter degreased previously using the wick supplied in the Kit.

Wait for about 15 minutes before continuing with the next operation to allow the adhesion promoter (primer) thinner to evaporate.


Enlarge the image


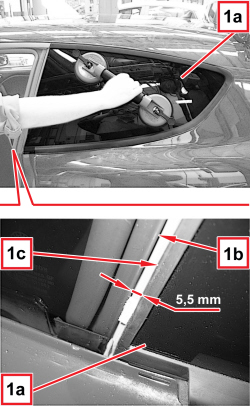
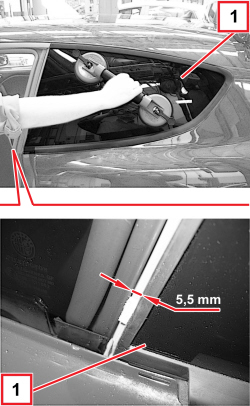
1. Carry out a test fitting of the window (1a) placing it on the body; close the front door with the window raised in the end of travel position, then check that the fixed window is correctly positioned.

In particular, check that the rear edge (1b) of the door window is 5.5 mm from the edge (1c) of the fixed window seal; carry out the check along the entire length of the edges (1b) and (1c).

- If necessary, adjust the door window after fitting the fixed window.

    Op. 7005D11 LOWERING WINDOW (ONE), LH OR RH, FOR FRONT SIDE DOOR - CHECK SLIDING - INCLUDES ARRANGING GUIDES, POSITIONING AND FASTENING WINDOW SUPPORT TO CONTROL


Enlarge the image


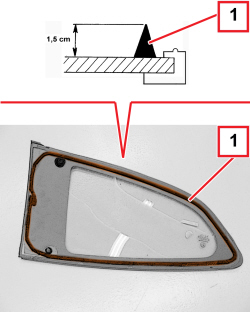
1. Using an air gun, apply a bead of sealant along the perimeter of the window glass as evenly as possible.


Component


Type


Name


Classification


Q.ty


Validity


FIXED SIDE WINDOW


Glass sealant


Product no. 71730189


-


Start the operation from the centre of the front side and continue without breaks around the entire perimeter of the glass.


Enlarge the image


1. Position the glass in its seat immedately after applying sealant and settle it into position.


Enlarge the image


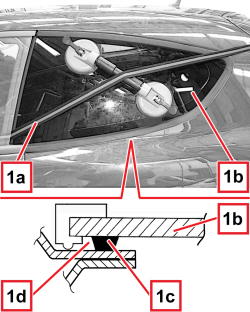
1. Position the belt (1a) as illustrated and tension it to exert even pressure on the entire window (1b) in order to guarantee that the glass (1b), sealant (1c) and window housing (1d) are correctly matched.

- Position the centre pillar upper cover and attach the upper inner retainers, then the lower inner retainers.

- Fit the door housing seal.

Do not move the vehicle for the time recommended by the sealant manufacturer.