
 Removing
(
Refitting
Removing
(
Refitting )
)
|
|
Removing
(
Refitting
)
|
|
|
|
|
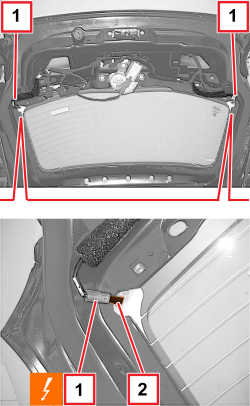  |
1. Working on the inside of the rearscreen glass, disconnect the heated rear windscreen side electrical connections.
2. Move the rearscreen side electrical connections so that they are not damaged when cutting the sealant. - Protect the interior vehicle parts using an appropriate cover. |
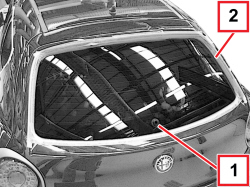  |
1. Remove the seal for the rearscreen wiper motor shaft. 2. Apply a double layer of adhesive tape to the body along the entire perimeter edge of the rearscreen. |
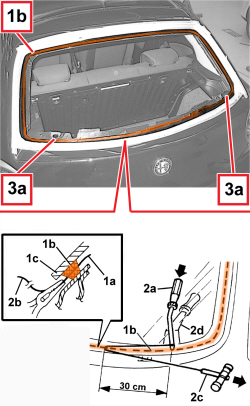  |
- The rearscreen sealant can be cut using piano wire or a vibrating knife; both methods are described below. - To cut using piano wire, proceed as described below. 1. Cut a length of wire of about 80 cm then, using pliers, introduce one end (1a) of the wire through the bead of sealant (1b) securing the rearscreen. 2. Fasten one end (1a) of the wire to the special retaining tool (2a) located inside the vehicle. Fasten one end (2b) of the wire to the traction handle (2c) located outside the vehicle. 3. The mechanic inside the vehicle should keep the end of the tool (2a) on the bead of sealant (1b) about 30 cm from the point where the wire passes through. The other mechanic, outside the vehicle, should pull the handle (2c) following the surround of the rearscreen and they should cut the bead of sealant (1b). When necessary, position a spatula (2d) by the tool (2a) to protect the inner parts of the vehicle. Repeat the operation in sections of about 30 cm until the bead of sealant (1b) is completely cut. Take care over the retaining mountings (3a) and electrical wiring (3b) during the cutting stage. |
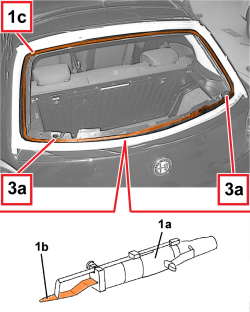  |
- To cut using a vibrating knife, proceed as described below. 1. Use the vibrating knife (1a) and blade (1b). Cut the sealant strip (1c) along the entire perimeter of the rearscreen, working from inside the vehicle for the upper and lower sides of the rearscreen and from outside the vehicle for the side areas. Take care over the retaining mountings (1d) and electrical wiring (1e) during the cutting stage. |
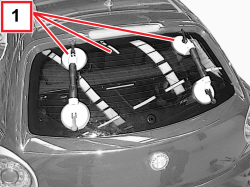  |
1. After cutting round the entire sealant strip, apply suction pads to the rearscreen and then, with the assistance of a second mechanic, remove the rearscreen and rest it on a support stand. |
  |
Refitting
(
Removing
)
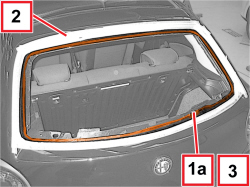
1. Using suitable equipment, cut and level the bead of sealant (1a) in the rearscreen housing leaving a thickness of between 0.25 and 1 mm, taking care not to scratch the paintwork. The thickness of the sealant remaining in the housing will act as a support for the new bonding. 2. Remove the adhesive tape from the edges of the bodywork. 3. Thoroughly clean the rearscreen housing using an air jet and degrease fully using heptane. When bonding, 60 minutes after the bead of sealant has been cut and levelled, the surface of the actual sealant must be treated using the special activating product and it is necessary to wait for 15 minutes before fitting the rearscreen.
- If necessary, touch up the paintwork. |
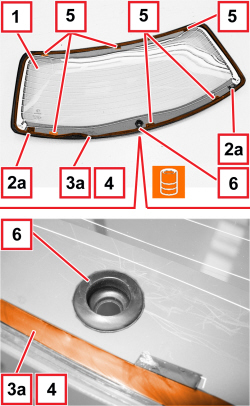  |
- Preparing a removed rearscreen. 1. The rearscreen that is removed can only be reused if it has not been damaged during the removal. 2. The centering pins (2a) do not have to be renewed. 3. Using a suitable tool cut and level the sealant strip (3a) on the rearscreen so that the thickness is reduced to a minimum. The remaining sealant does not have to be completely removed; take care not to damage the black serigraphy on the glass perimeter. 4. Clean the perimeter serigraphed area of the window thoroughly with an air jet and degrease fully with heptane. Check that the glass is not damaged. 5. Apply new shims. 6. Attach the seal in the rearscreen wiper motor shaft opening. - When bonding, 60 minutes after the bead of sealant has been cut and levelled, the surface of the actual sealant must be treated using the special activating product and it is necessary to wait for 15 minutes before fitting the rearscreen.
|
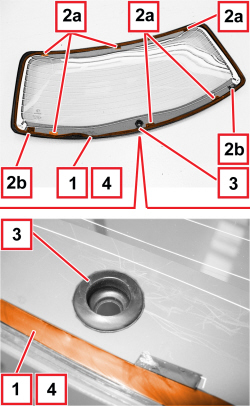  |
- New rearscreen preparation. 1. Degrease the serigraphed perimeter of the new rearscreen involved in the bonding using heptane. 2. Check that the shims (2a) and the retainers (2b) are fitted. 3. Attach the seal in the rearscreen wiper motor shaft opening. 4. Apply the glass adhesion promoter (primer) to the entire serigraphed perimeter degreased previously using the wick supplied in the Kit.
|
  |
- Refit the windscreen wiper motor. |
|
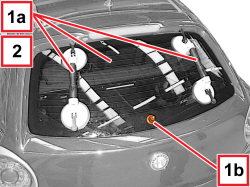
1. Carry out a test fitting of the rearscreen (1a), then check it is centered in the tailgate housing using the windscreen wiper motor (1b) pin as a reference. 2. Remove the rearscreen. |
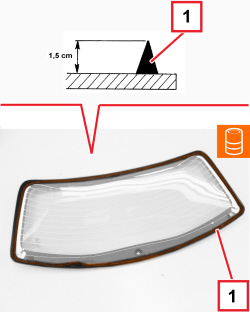  |
1. Using an air gun, apply a strip of sealant along the perimeter of the rearscreen as evenly as possible.
|
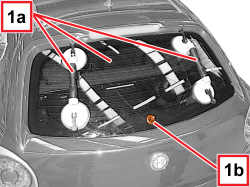  |
1. With the help of a second mechanic place the rearscreen (1a) in position immediately after applying the sealant and let it bed in using the windsreen wiper motor pin (1b) as a reference. |
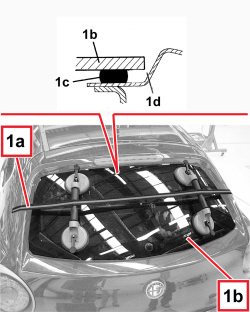  |
1. Position the belt (1a) as illustrated and tension it to exert even pressure on the entire rearscreen (1b) in order to guarantee that the glass (1b), sealant (1c) and rearscreen housing (1d) are correctly matched. |
|
|
- Before refitting the vehicle interior and exterior elements, check that there are no infiltration points by carrying out a water leakage test. - Connect the heated rear windscreen electrical connections. |
|
|
|
|

