|
 Removing
(
Refitting Removing
(
Refitting )
)
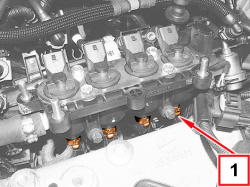
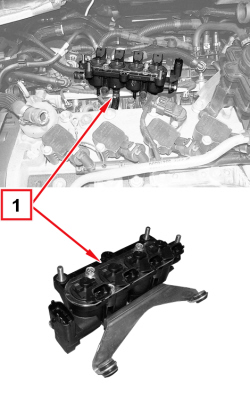
 | The LPG injector assembly cannot be separated. A single LPG injector is not available at the Spare Parts Dpt. |
|
|
|
- Return the car to the workshop (in petrol operation mode).
|

|
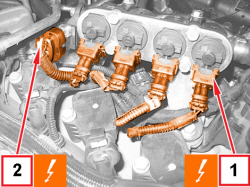
1. Disconnect the electrical connections for the LPG injectors.
2. Disconnect the electrical connection for the LPG temperature and pressure sensor.
|
|
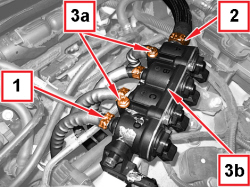
1. Loosen the bands and disconnect the LPG injector connectors.
2. Loosen the band and disconnect the LPG injector unit inlet pipe, LPG injector unit side.
3. Undo the screws (3a) and remove the LPG injector unit (3b).
|
|
Refitting
(
Removing
)
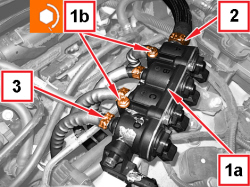
1. Place the LPG injector unit (1a) in position and tighten the screws (1b) to the prescribed torque. |
|
LPG injector assembly |
Screw |
M6 |
0.9 ÷ 1.1 |
1.4 16V TJet 120 HP |
2. Connect the LPG injector unit inlet pipe, LPG injector unit side, and tighten the band. | Maintain a distance of 3 - 5 mm between the band and the end of the pipe. |
3. Connect the connectors to the LPG injectors and tighten the bands. | Keep a distance of 2-3 mm between the bands and the ends of the connectors. |
|
|
|
- Connect the electrical connection for the LPG temperature and pressure sensor.
- Connect the electrical connections for the LPG injectors.
|
APPLIES TO VERSIONS WITH: Euro 5
|
|
Removing
(
Refitting
)
| The LPG injector unit cannot be disassembled. A single LPG injector is not available at the Spare Parts Dpt. |
- Drain the section of pipe from the LPG pressure regulator to the injectors, following the procedure and the instructions given Op. 1043A02 LPG SYSTEM LINES PIPE DRAINING OPERATIONS |
|
APPLIES TO VERSIONS WITH: Euro 5
|
|
- Return the car to the workshop (in petrol operation mode).
|
|
APPLIES TO VERSIONS WITH: Euro 5
APPLIES TO VERSIONS WITH: Euro 5
APPLIES TO VERSIONS WITH: Euro 5
|
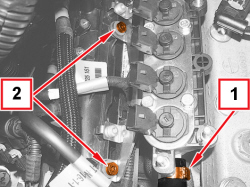
1. Open the band and disconnect the LPG injector unit inlet pipe, LPG injector unit side.
2. Undo the screws fixing the LPG injector unit mounting bracket, intake chamber side.
|
|
APPLIES TO VERSIONS WITH: Euro 5
APPLIES TO VERSIONS WITH: Euro 5
APPLIES TO VERSIONS WITH: Euro 5
|
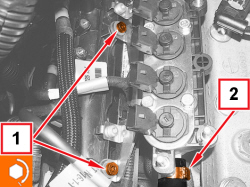
1. Tighten the screws fixing the LPG injector unit mounting bracket to the prescribed torque, intake chamber side.
2. Connect the LPG injector unit inlet pipe, LPG injector unit side, and tighten the band.
|
|
Maintain a distance of 3 - 5 mm between the band and the end of the pipe.
|
|
|
APPLIES TO VERSIONS WITH: Euro 5, Euro 6
|
|
- Close the bands fixing the connectors to the LPG injectors.
|
|
Maintain a distance of 2-3 mm between the bands and the ends of the pipes.
|
|
|
APPLIES TO VERSIONS WITH: Euro 5
APPLIES TO VERSIONS WITH: Euro 6
APPLIES TO VERSIONS WITH: Euro 6
|
|
- Return the car to the workshop (in petrol operation mode).
|
|
APPLIES TO VERSIONS WITH: Euro 6
APPLIES TO VERSIONS WITH: Euro 6
APPLIES TO VERSIONS WITH: Euro 6
|
1. Open the band and disconnect the LPG injector unit inlet pipe, LPG injector unit side.
2. Undo the screws fixing the LPG injector unit mounting bracket, intake chamber side.
|
|
APPLIES TO VERSIONS WITH: Euro 6
APPLIES TO VERSIONS WITH: Euro 6
APPLIES TO VERSIONS WITH: Euro 6
|
1. Tighten the screws fixing the LPG injector unit mounting bracket to the prescribed torque, intake chamber side.
2. Connect the LPG injector unit inlet pipe, LPG injector unit side, and tighten the band.
|
|
Maintain a distance of 3 - 5 mm between the band and the end of the pipe.
|
|
|
APPLIES TO VERSIONS WITH: Euro 6
|
|
- Close the bands fixing the connectors to the LPG injectors.
|
|
Maintain a distance of 2-3 mm between the bands and the ends of the pipes.
|
|
|
APPLIES TO VERSIONS WITH: Euro 6