145 - MiTo   1.4 16v TJet   CAR RADIO EQUIPMENT - R+R   5570T80   

Detail     Detail


Enlarge the image


Removing ( Refitting )

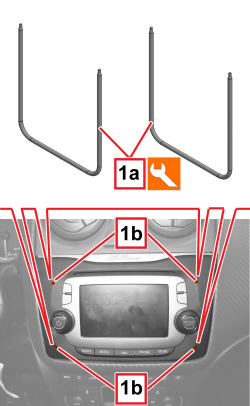
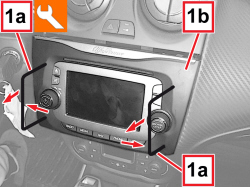
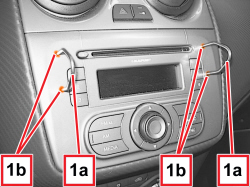
1. Insert the tools (1a) fully in the openings (1b) in the radio.


Tool


Name


Function


Validity


2000027600


Forks


Radio extraction


Enlarge the image


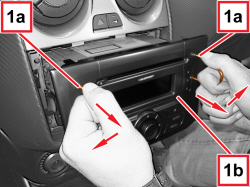
1. Grab the tools (1a) and, pushing them towards the outside and pulling them towards oneself, extract the radio (1b).


Enlarge the image


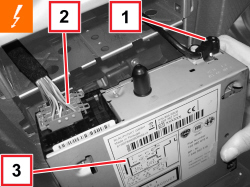
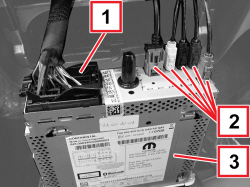
1. Disconnect the antenna connection.

2. Disconnect the electrical connection.


Name


Connector


2


RADIO


   See P020 CAR RADIO

3. Keep the radio.

- Remove the tools from the radio.

Refitting ( Removing )

- Check that the radio is not damaged.

- Connect the electrical connection.

- Connect the antenna connection.

- Check that the radio and the speakers are working.

- Place the radio in position and attach the inner retainers.

While fitting the radio, press on the angles of the device and avoid touching the buttons and the screen.

Take care not to pinch the electrical wires.

- Check that the radio and the speakers are working.

APPLIES TO VERSIONS WITH: M.Y. 2013


Enlarge the image


Removing ( Refitting )

1. Insert the tools (1a) fully into the openings (1b) on the radio.


Tool


Name


Function


Validity


2012500230


Forks


Radio extraction


APPLIES TO VERSIONS WITH: M.Y. 2013


Enlarge the image


While inserting the tools, press them slightly towards the inner part of the radio.

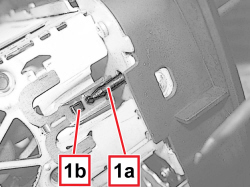
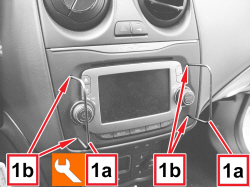
1. Make sure that the ends of the forks (1a) engage with the retaining tabs (1b).

APPLIES TO VERSIONS WITH: M.Y. 2013


Enlarge the image


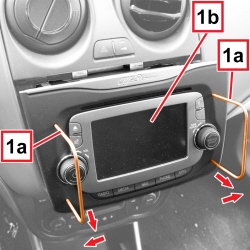
1. Grip the tools (1a) and, pushing them towards the outside and extract the radio (1b) by pulling them towards yourself.

APPLIES TO VERSIONS WITH: M.Y. 2013


Enlarge the image


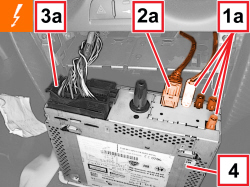
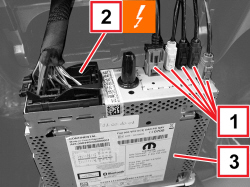
1. Disconnect the aerial connections (1a).

2. Disconnect the USB connection (2a).

3. Disconnect the electrical connection (3a).


Name


Connector


3


RADIO


   See P020 CAR RADIO

4. Keep the radio.

APPLIES TO VERSIONS WITH: M.Y. 2013

Refitting ( Removing )

- Check that the radio is not damaged.

- Connect the electrical connections.

- Connect the aerial and USB connections.

- Insert the radio into its housing and engage the internal locating pin.

While fitting the radio, press on its corners and avoid touching the buttons and the screen.

Take care not to pinch the electrical wires.

- Check that the radio / radio-navigator is working.

For all cars equipped with a uConnect radio/radio-navigator, to replacing it, connect the diagnosis equipment to the car EOBD socket:

- In the Topological environment, select “Vehicle Preparation” and then “Proxy Alignment Procedure”.

- If the connecting the new radio or the new radio-navigator (ETM control unit) has caused some temporary errors, use the dedicated key in the Topological environment to perform a “delete errors”.

- Now, click “ETM” on the topology.

- Select the “Miscellaneous Functions” environment and perform the “Write VIN” procedure, carefully following the instructions given by the diagnosis equipment.

APPLIES TO VERSIONS WITH:


Enlarge the image


Removing ( Refitting )

1. Insert the tools (1a) fully in the openings (1b) in the radio.


Tool


Name


Function


Validity


2012500230


Forks


Radio extraction


APPLIES TO VERSIONS WITH:


Enlarge the image


1. Grab the tools (1a) and, pushing them towards the outside and pulling them towards oneself, extract the radio (1b).

APPLIES TO VERSIONS WITH:


Enlarge the image


1. Disconnect the antenna connection.

2. Disconnect the electrical connection.


Name


Connector


2


RADIO


   See P020 CAR RADIO

3. Keep the radio.

- Remove the tools from the radio.

APPLIES TO VERSIONS WITH:


Enlarge the image


Refitting ( Removing )

- Check that the radio is not damaged.

- Connect the electrical connection.

- Connect the antenna connection.

- Check that the radio and the speakers are working.

- Place the radio in position and attach the inner retainers.

While fitting the radio, press on the angles of the device and avoid touching the buttons and the screen.

Take care not to pinch the electrical wires.