|
 Removing
(
Refitting Removing
(
Refitting )
)
 | I morsetti della batteria devono essere scollegati solo con chiave di avviamento su STOP o estratta, mai con chiave su MAR o con motore avviato. Lo stacco dei morsetti deve comunque essere effettuato dopo aver atteso almeno 1 minuto dal posizionamento della chiave su STOP. Per versioni con cambio Robotizzato, prima di scollegare i morsetti, accertarsi che la porta lato guida sia chiusa per evitare che la fase di pressurizzazione impianto idraulico, comandata dall'apertura porta, venga interrotta prima del suo completamento. |
|

|
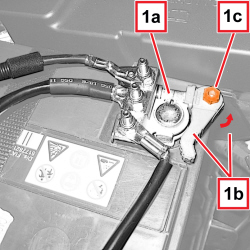
1. Disconnect the negative pole terminal (1a) from the battery after having loosened it by turning the cam lever (1b).
If necessary, turn the cam lever (1b) using a spanner on the hexagonal socket (1c).
|
|
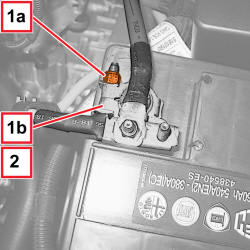
1. Loosen the nut (1a) for the positive battery terminal (1b).
2. Disconnect the positive terminal from the battery.
|
|
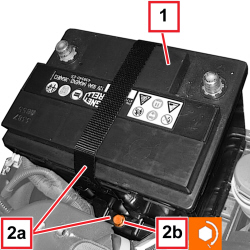
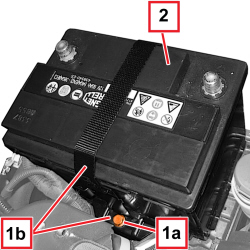
1. Undo the nut (1a) and move the bracket and battery retaining belt (1b).
2. Remove the battery.
|
|
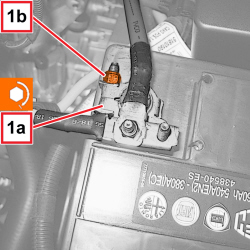
1. Place the terminal (1a) for the positive battery pole in position and tighten the nut (1b) to the recommended torque.
|
Positive battery terminal |
Nut |
M6 |
0.4 ÷ 0.6 |
|
|
|
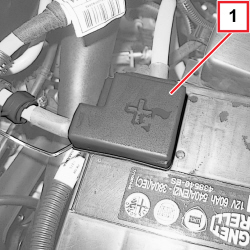
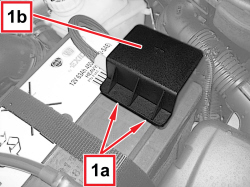
- Place the protection on the positive battery terminal and attach the retainers.
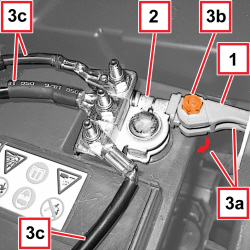
- Place the negative battery pole terminal in position, proceeding as follows:
1. Make sure that the cam lever is in the open position.
2. Fit the terminal in the negative battery pole and press it down firmly.
3. Turn the cam lever (3a) tightening the terminal (2) on the negative pole.
If necessary, turn the cam lever (3a) using a spanner on the hexagonal socket (3b).
Check that the cables (3c) are correctly routed without being taut or forced.

|
Pull the cables (3c) gently to check that the terminal (2) is properly attached.
|
|
|
|
- Check that the electrical system is working.
|
APPLIES TO VERSIONS WITH: GPL, Euro 5, Euro 6
|
|
Removing
(
Refitting
)
| I morsetti della batteria devono essere scollegati solo con chiave di avviamento su STOP o estratta, mai con chiave su MAR o con motore avviato. Lo stacco dei morsetti deve comunque essere effettuato dopo aver atteso almeno 1 minuto dal posizionamento della chiave su STOP. Per versioni con cambio Robotizzato, prima di scollegare i morsetti, accertarsi che la porta lato guida sia chiusa per evitare che la fase di pressurizzazione impianto idraulico, comandata dall'apertura porta, venga interrotta prima del suo completamento. |
|
|
APPLIES TO VERSIONS WITH: GPL, Euro 5, Euro 6
|
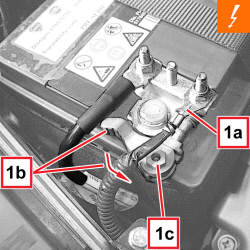
1. Disconnect the negative pole terminal (1a) from the battery after having loosened it by turning the cam lever (1b).
If necessary, turn the cam lever (1b) using a spanner on the hexagonal socket (1c).
|
|
APPLIES TO VERSIONS WITH: GPL, Euro 5, Euro 6
APPLIES TO VERSIONS WITH: GPL, Euro 5, Euro 6
|
1. Loosen the nut (1a) for the positive battery terminal (1b).
2. Disconnect the positive terminal from the battery.
|
|
APPLIES TO VERSIONS WITH: GPL, Euro 5, Euro 6
|
1. Undo the nut (1a) and move the bracket and battery retaining belt (1b).
2. Remove the battery.
|
|
APPLIES TO VERSIONS WITH: GPL, Euro 5, Euro 6
APPLIES TO VERSIONS WITH: GPL, Euro 5, Euro 6
|
1. Place the terminal (1a) for the positive battery pole in position and tighten the nut (1b) to the recommended torque.
|
Positive battery terminal |
Nut |
M6 |
0.4 ÷ 0.6 |
|
|
|
APPLIES TO VERSIONS WITH: GPL, Euro 5, Euro 6
|
- Place the protection on the positive battery terminal and attach the retainers.
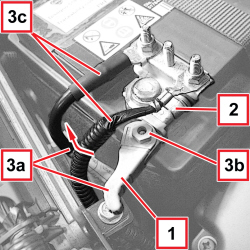
- Place the negative battery pole terminal in position, proceeding as follows:
1. Make sure that the cam lever is in the open position.
2. Fit the terminal in the negative battery pole and press it down firmly.
3. Turn the cam lever (3a) tightening the terminal (2) on the negative pole.
If necessary, turn the cam lever (3a) using a spanner on the hexagonal socket (3b).
Check that the cables (3c) are correctly routed without being taut or forced.
|
|
Pull the cables (3c) gently to check that the terminal (2) is properly attached.
|
|
|
APPLIES TO VERSIONS WITH: GPL, Euro 5, Euro 6
|
|
- Check that the electrical system is working.
|
|