





|






|
|
| Service News | ||
|
|
ALFA MiTo
Version: all models |
|
|||
| 7065 1 271 CF |
INTERIOR REAR VIEW MIRROR
Bonding of base for interior rear view mirror - Service Solution |
|||
FAULT COMPLAINED OF
Detaching of the rear view mirror.
TECHNICAL CAUSE
Detaching of the fastening plate from the windscreen.
OPERATIONS IN PRODUCTION
The bonding system for the interior rear view mirror mounting plate inside the windscreen has been improved.
IPLEMENTATION OF MODIFICATION
|
Version |
Factory |
Line |
Chassis No. |
Organisation No. |
|
All models in question with rain sensor |
Mirafiori |
- |
1148731 |
147055 |
OPERATIONS IN NETWORK
Network behaviour standards towards the Customer
- Once this problem is reported and confirmed, reassure the Customer that it can be solved by restoring the correct bonding of the rear view mirror.
- After the intervention, show the customer what has been done and make sure he is satisfied.
Service Solution
If the claimed fault is confirmed, secure the fastening plate and bond the interior rear view mirror assembly again, according to the Operating Cycle below.
OPERATION CYCLE
If the mirror and the fastening plate are detached from the windscreen: disconnect the electrical connections, retain the rear view mirror assembly and check the conditions of the windscreen glass screen-printing in the application area of the plate and in the fastening area of the same mirror.

|
If the plate bonding area has some residues of primer, such as a grey round spot around the base bonding area and/or possible damage of the screen-printing, the Service News cannot be implemented because the same windscreen cannot be reused. |
If the Service News can be implemented, proceed as below described.
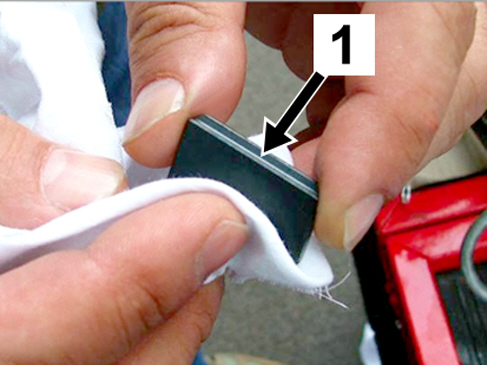
- Take the mirror fastening plate (1 - Fig. 1), clean it from adhesive residues and thoroughly degrease the plate bonding surface using disposable paper and heptane, as shown in Fig. 1.
Fig. 1

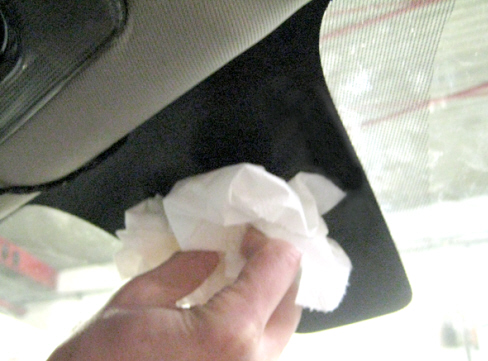
- If no primer residues are found, remove possible residues of old adhesive from the windscreen glass and thoroughly degrease the matching surface with disposable paper and heptane, as shown in Fig. 2.
Fig. 2
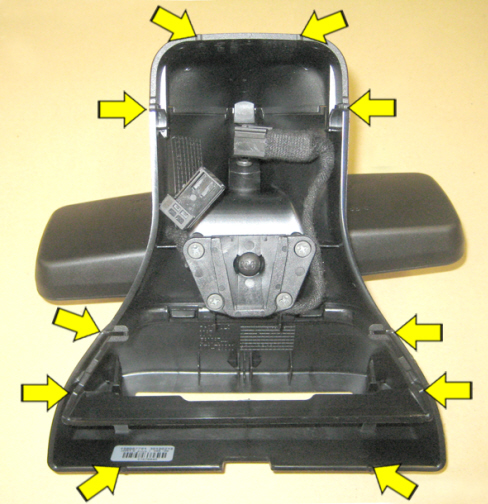
- Use a cutter, or similar, to totally remove the tabs in the points shown in Fig. 3, from the trim edge.
Fig. 3
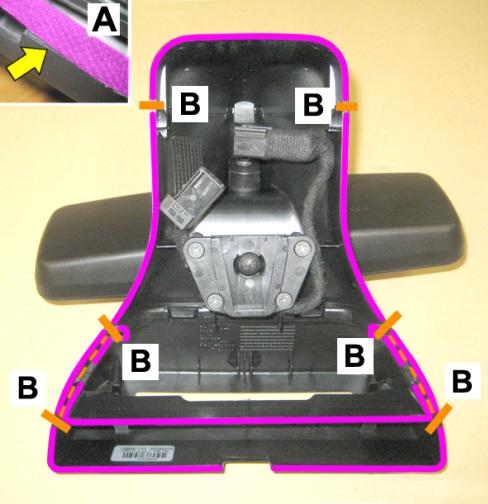
- Apply on the edge contour touching the windscreen some felt adhesive tape - no. 71711969, or similar - without coming out from the edge of the trim, as shown in (A - Fig. 4); the tape is shown in purple for a clearer explanation. Fold the excess tape inside the trim.
- By a cutter or similar, cut the felt adhesive tape next to the trim junctions, as shown (details B) for an easier partial removal of the trims; the cutting points are shown in orange.
Fig. 4
- Download the following file: (Dime_MiTo.pdf)

|
- unzip and print the file - Dima_MiTo.pdf - with the fastening plate positioning template.
|
|
Use a ruler to measure the printed value; the length stated on the xerox copy should really correspond to 100 mm. Otherwise the template is wrong and the service cycle cannot be implemented properly. To get the exact dimensions, suitably adjust the xerox machine zoom +/-. |
- Bond the copy of the template, once properly printed, on a cardboard and cut along the edges, as shown in Fig. 5.
Fig. 5
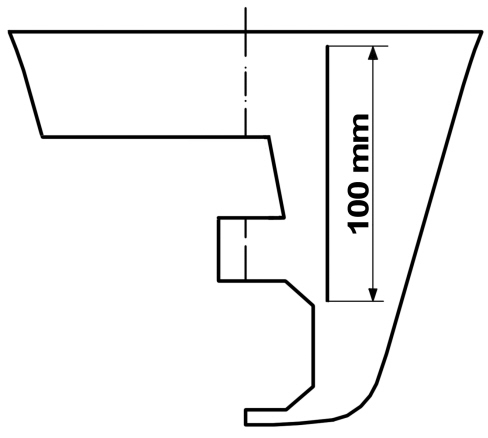
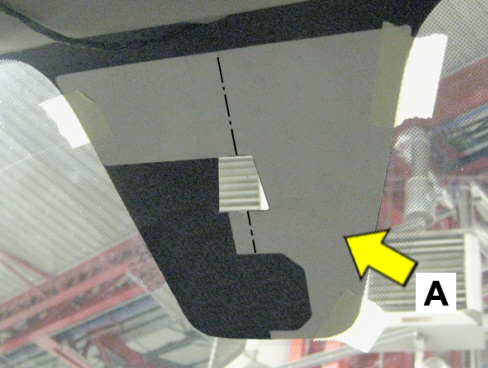
- Apply the template (A) on the windscreen, so that it matches with the screen-printed contour, as shown in Fig. 6 and fasten it with some sections of adhesive tape:

|
Make sure that the template perfectly matches with the screen-printed contour. |
Fig. 6
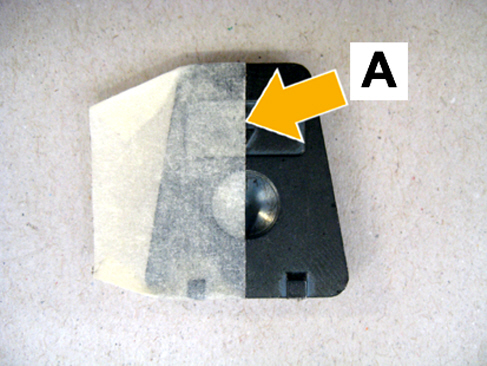
- Arrange the plate marking the centre line on the side opposite the one to be bonded on the windscreen, using adhesive tape, as shown in (A - Fig. 7).
Fig. 7
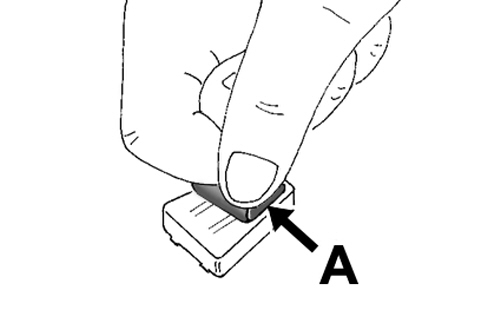
- Cut the treated fabric (A - Fig. 8) - included in the bonding kit no. 71712580 - a bit smaller than the areas of the plate touching the windscreen.
|
|
The fabric should be handled with clean hands. |
- Evenly apply and distribute the adhesive on the plate (about 2 or 3 drops). Overlap the fabric (A) - cut to measure - to the plate, as shown.
Fig. 8
|
|
For the use of chemicals closely follow the instructions and warnings on the safety sheet that the supplier must give the consumer in accordance with the laws in force in the area (for Italy in accordance with Legislative Decrees 52/97 and 285/98 and subsequent modifications and additions). |
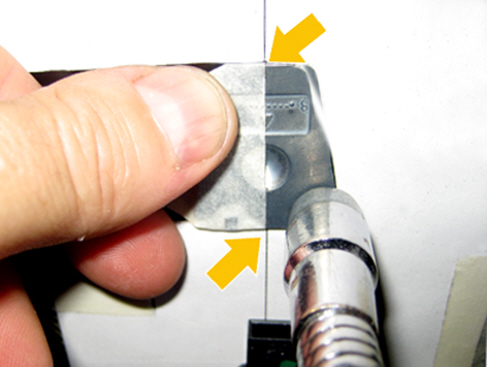
- COMPULSORILY, within 30 seconds, place the plate on the windscreen glass, aligning the centre line reference of the template and of the plate, as shown in Fig. 9.
- Keep the plate in place for at least 30 seconds, manually pressing a bit.
- After NOT LESS THAN 6 HOURS remove the template and reconnect the internal rear view mirror, previously arranged with the felt tape, with reference to Op. 7065C60 of the Service Manual.
|
|
The rear view mirror should NOT be subject to stress over the next 24 hours so that the correct adhesion is not affected. |
Fig. 9
AVALABILITY OF PARTS
|
Version |
Description |
Part No. |
Q.ty |
|
All models in question |
Bonding kit for internal rear view mirror plate |
71712580 |
1 |
|
All models in question |
Felt adhesive tape (*) |
71711969 (*) |
1 (*) |
(*) Each roll (10 m) is enough for 11 cars
CLAIM REPORT DATA
|
Version |
Operation |
Part |
Fault |
Position |
Time allowance |
|
All models in question |
7065127 |
1 |
CF |
- |
0.50 |