










Service News
Copyright By Fiat Group Automobiles S.p.A. - Printed 26/09/2008


Alfa MiTo


all versions
70
08.08
7005 1 681 PA ELECTRIC WINDOWS
Interference between front windows and door seal - Service Solution


FAULT COMPLAINED OF

Insufficient lowering of windows when door is opened which causes difficulties in opening the door through interference with the seal.

TECHNICAL CAUSE

Incorrect positioning of front window.

OPERATIONS IN NETWORK

Network behaviour standards towards the Customer

-When this problem is reported and confirmed, reassure the customer that it can be solved by checking and adjusting the window/window opening mechanism.-After the operation show the customer what has been done and carry out a test to make sure they are satisfied.

Service Solution

If this problem is reported and confirmed, check and adjust the window/window opening mechanism as described in the Operating Cycle below.

OPERATION CYCLE

Check the position of the window opening mechanism:

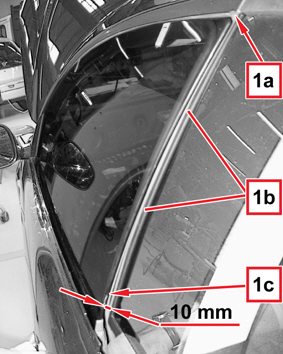
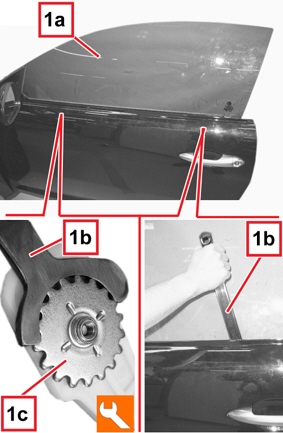
-Open the door, then start to close it until it is touching the top inner corner (1a - Fig. 1) of the window at the door housing seal (1b); in this condition the lower part (1c) fhte window should be about 10 mm away from the door housing seal (1b) (closing preloading).

Fig. 1


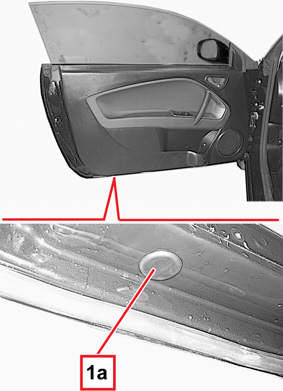
    -If necessary, carry out the appropriate adjustment: Working on the lower part of the door at the rear, release the rubber cover (1a - Fig. 2).

    Fig. 2


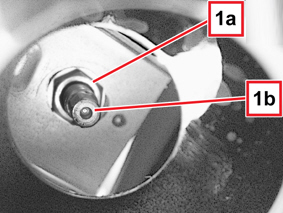
      -Loosen the locknut (1a - Fig. 3) for the adjustment system and turn the shaft (1b) clockwise or anti-clockwise until the window is in the correct position, then, when the operation is over, tighten the actual locknut.

      It is advisable to rotate the shaft (1b - Fig. 3) using small, gradual movements.

      Fig. 3


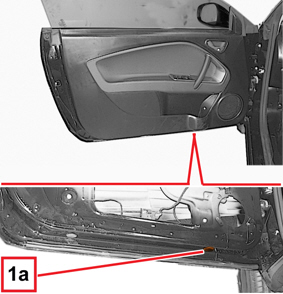
        -There is another adjustment system for the window opening mechanism on the front side of the door, inside the cover (1a - Fig. 4), but this is set by the manufacturer and should not be adjusted

        Fig. 4


          Check the sliding and the position of the lowering window:

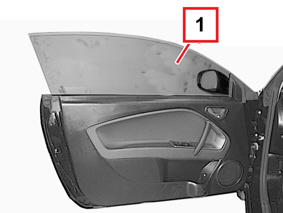
          -Move the lowering window (1 - Fig. 5) until it is in the open or closed end of travel position, checking that it slides evenly without sticking. Then check the position of the glass in the closed end of travel position with the door both open and shut.

          Fig. 5


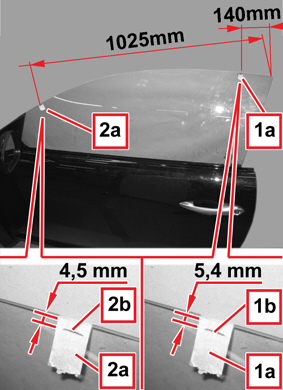
            -Apply adhesive tape to the upper edge of the window (1a - Fig. 6) 140 mm from the rear corner as illustrated.-Mark a line (1b - Fig. 6) on the outer side of the adhesive tape, 5.4 mm from the upper edge of the window (sinking distance of the window in the seal).-Apply adhesive tape to the upper edge of the window (2a - Fig. 6) 1025 mm from the rear corner as illustrated.-Mark a line (2b - Fig. 6) on the outer side of the adhesive tape, 4.5 mm from the upper edge of the window (sinking distance of the window in the seal).-Close the door.

            Fig. 6


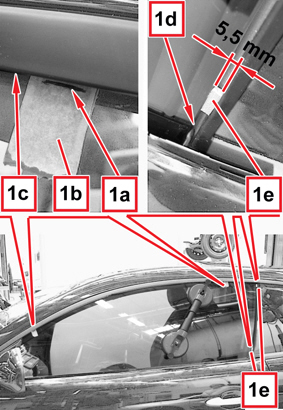
              -Check that the lines (1a - Fig. 7) of the adhesive tapes (1b) are in line with the edge (1c) of the upper seal.-Check that the rear edge of the wnidow is 5.5 mm from the edge (1d - Fig. 7) of the rear seal; carry out a check in areas (1e).

              Fig. 7


                If necessary, proceed with the adjustment of the lowering window as described below:

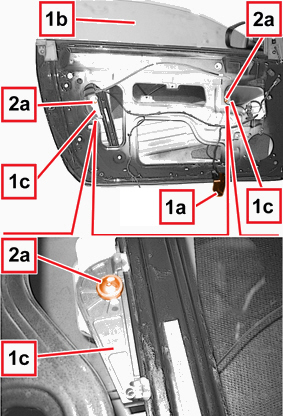
                -Remove the switch unit on the driver''s or passenger side front door as described in the relevant procedure (Op. 7005M14 or Op. 7005M12) in the Service Manual.-Remove the lower courtesy light in the front door panel as described in the relevant procedure (Op. 7040E24) in the Service Manual.-Remove the corner cover as described in the appropriate procedure (Op. 7005E12) in the Service Manual.-Remove the door panel as described in the appropriate procedure (Op. 7005E10) in the Service Manual.-Remove the water guard as described in the appropriate procedure (Op. 7005A04) in the Service Manual.-Remove the lowering window outer glass scraper as described in the relevant procedure (Op. 7005D26) in the Service Manual.-Provisionally connect the window switch unit to the electric connection (1a - Fig. 8), then move the lowering window (1b) until the glass retainers (1c) are in an accessible position (as in the figure).-Loosen the window fixing bolts (2a - Fig. 8) slightly.-Provisionally reconnect the window opening switch unit to the electrical connection (1a - Fig. 8), then raise the lowering window (1b) until it is in the upper end of travel position.

                Fig. 8


                  -Working between the outside of the window (1a - Fig. 9) and the door frame (outer glass scraper housing), using the special tool 2000032100 (1b) loosen the two toothed ring nuts (1c) for the window retainers slightly.

                  Fig. 9


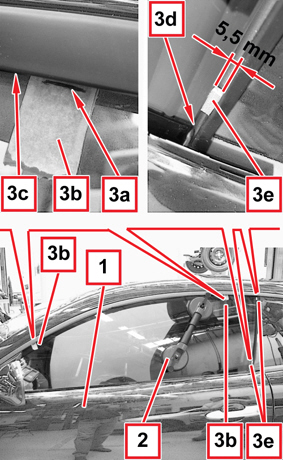
                    -Shut the door (1 - Fig. 10) and fit a suction pad (2) to the middle of the glass in order to be able to move it.-Move the window brining the lines (3a - Fig. 10) for the adhesive tape (3b) in line with the edge (3c) of the upper seal and 5.5 mm from the edge (3d) of the rear seal. To facilitate the adjustment of the window, it is advisable to insert two 5.5 mm shims (3e) between the window and the rear seal edge as shown in the figure.

                    Fig. 10


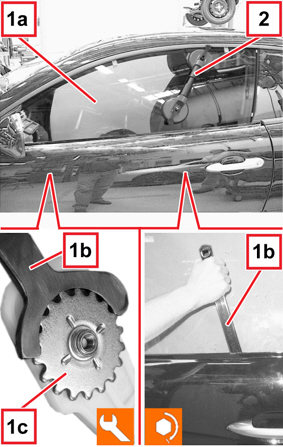
                      -With the window adjusted as described previously, working between the outside of the window (1a - Fig. 11) and the door frame (outer glass scraper housing), using the special tool 2000032100 (1b) tighten the two toothed ring nuts (1c) for the window retainers to the recommended torque of 1.2 daNm.-Remove the suction pad (2 - Fig. 11).

                      Fig. 11


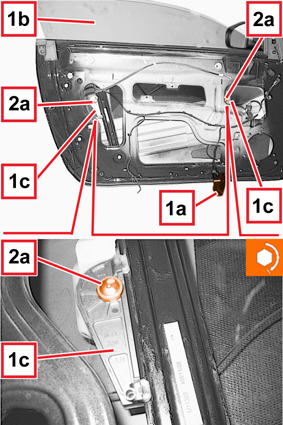
                        -Open the door and provisionally connect the window switch unit to the electric connection (1a - Fig. 12), then lower the lowering window (1b) until the glass retainers (1c) are in an accessible position (as in the figure).-Tighten the window fixing bolts (2a - Fig. 12) to the recommended torque of 0.5 daNm.

                        Fig. 12


                          Move the door several times and check the automatic lowering of the window when the door is being opened and its automatic raising after the door has been shut (short drop function).

                          The problem is considered to be solved when the window descends sufficiently to be released from the door seal.

                          Refit the parts removed from the door

                          Carry out the window opening mechanism initialization procedure.

                          CLAIM REPORT DATA


                          Version


                          Operation


                          Piece


                          Fault


                          Position


                          Time allowance


                          all versions in question


                          7005168


                          1


                          PA


                          010-090


                          1.10