
 Removing
(
Refitting
Removing
(
Refitting )
)
 | This procedure is valid only for the 1.4 16v TJet - 120 HP version with C510.5 gearbox |
|
|
Removing
(
Refitting
)
|
 |
- Release the gearbox and differential from the support tool used for removing-refitting from the vehicle.
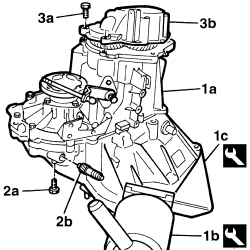
1. Fit the gearbox and differential (1a) on the overhaul stand (1b) using tool (1c).
2. Undo the screw (2a) and remove the odometer idler gear (2b). 3. Undo the screws (3a) and remove rear cover (3b). |
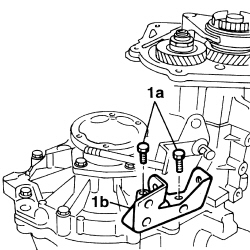 |
1. Undo the screws (1a) and remove the gear selection/engagement device mounting bracket (1b). |
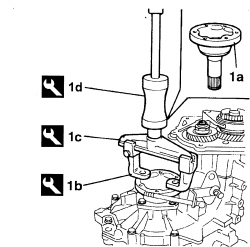 |
1. Remove the left differential internal driveshaft (1a) using the tool comprising the brackets (1b), the strut (1c) and the mallet (1d).
|
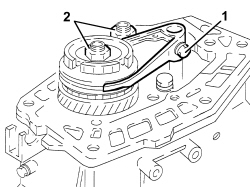 |
- Engage any gear using the gear selection/engagement lever. 1. Undo the screw fixing the 5th speed fork to the main shaft. - Engage the 5th speed by pressing the fork on the main shaft.
2. Straighten the staking and loosen the ring nuts for the main and layshafts. - Place the 5th speed control fork in neutral.
|
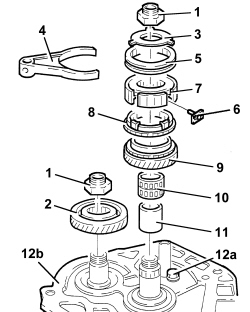 |
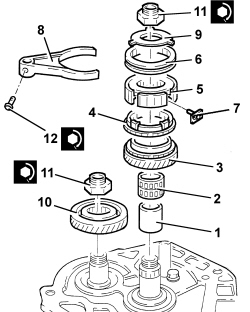
1. Completely undo the ring nuts for the main and layshafts. 2. Remove the 5th speed driven gear. 3. Remove the 5th speed synchronizer rollers and springs retaining flange. 4. Remove the 5th speed control fork. 5. Remove the 5th speed engagement sliding sleeve. 6. Remove the pre-synchronizer mountings. 7. Remove the 5th speed engagement sliding sleeve hub. 8. Remove the 5th speed synchronizer ring. 9. Remove the 5th speed drive gear. 10. Remove the needle bearing for the 5th speed drive gear. 11. Remove the 5th speed drive gear bush. 12. Undo the screw (12a) and remove the main and layshaft rear bearing retaining plate (12b). |
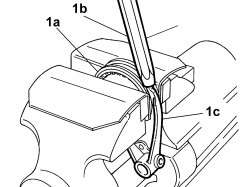 |
1. Lock the sleeve (1a) in the vice fitted with protective plates, then use a brass drift (1b) alternately on the two ends of fork (1c) until it is released from the sleeve.
|
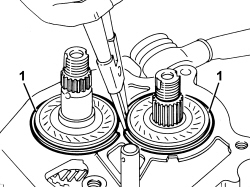 |
1. Remove the main and layshaft rear bearing retaining rings. |
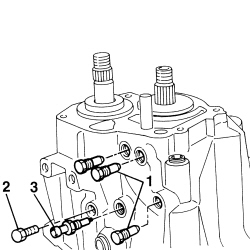 |
1. Undo the plugs for positioning the gear control rods. 2. Undo the reverse shaft securing screw. 3. Unscrew the reverse light switch. |
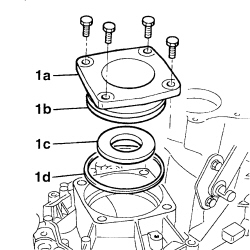 |
1. Undo the securing screws and remove the differential flange (1a) complete with O-ring (1b), oil seal (1c) and thrust ring (1d). |
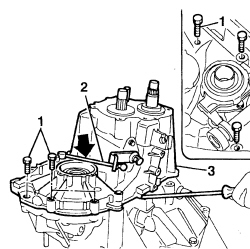 |
1. Undo the screws securing the gearbox casing to the manual gearbox bellhousing. 2. Place the gear selector lever downwards. 3. Remove the gearbox casing using two screwdrivers for leverage by the special projections. |
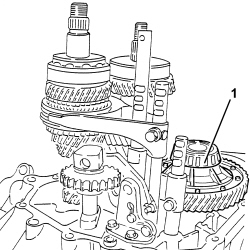 |
1. Remove the differential assembly. |
 |
Refitting
(
Removing
)
- Fit the differential assembly. - Place all the gear control forks in neutral. - Apply sealant to the contact surfaces between the manual gearbox bellhousing and the gearbox casing. - Fit the gearbox casing on the manual gearbox bellhousing.
- Tighten the gearbox casing screws to torque.
- Fit the gear control rod positioning plugs. - Tighten the reverse shaft screw to the prescribed torque.
- Fit the reverse light switch. - Fit the main and layshaft rear bearing retaining rings.
- Apply sealant to the contact surfaces between the gearbox casing and the main and layshaft rear bearing retaining plate. - Fit the main and layshaft rear bearing retaining plate and secure it by tightening the screw to the prescribed torque.
1. Fit the 5th speed drive gear bush. 2. Fit the needle bearing for the 5th speed drive gear. 3. Fit the 5th speed drive gear. 4. Fit the 5th speed synchroniser gear. 5. Fit the 5th speed engagement sliding sleeve hub. 6. Fit the 5th speed engagement sliding sleeve. 7. Place the synchronizer mountings in their housings. 8. Fit the 5th speed control fork. 9. Fit the 5th speed synchronizer rollers and springs retaining flange. 10. Fit the 5th speed driven gear. 11. Tighten the new ring nuts for the main and layshafts to torque.
12. Tighten the screw for the 5th speed control fork to the prescribed torque.
|
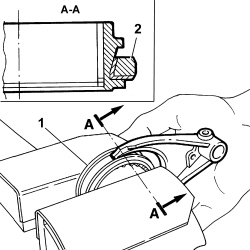 |
1. Lock the sleeve in a vice fitted with protective plates; 2. Position the fork so that the tapered part is in the same direction as that of the sleeve, resting it against the shoulder on the side where the sleeve diameter is smaller; - fit the fork manually, exerting the necessary pressure, until it is completely inserted in the sleeve. |
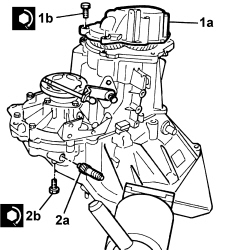 |
- Apply sealant to the contact surfaces between the main and layshaft rear bearings retaining plate and the rear cover. 1. Fit the rear cover (1a) and secure it by tightening the screws (1b) to the prescribed torque.
2. Fit the odometer idler gear (2a) and secure it with the screw (2b). |
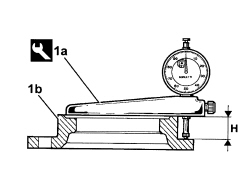 |
1. Position the tool (1a), complete with dial gauge, on the differential flange (1b) and measure distance "H" (flange height).
|
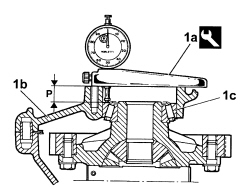 |
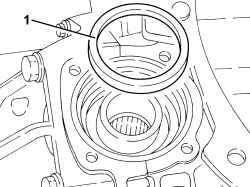
1. Position the tool (1a) complete with dial gauge on the differential flange support surface (1b) and measure distance "P" (depth) between differential flange support plane and bearing outer race (1c).
|
 |
- Calculate thickness "S" of the differential bearing pre-loading thrust ring, using the following formula: S = P - H + 0.12
1. Place the differential bearing pre-loading thrust ring(s) in position. |
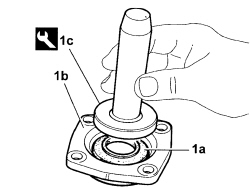 |
1. Fit a new oil seal (1a) on differential flange (1b) using tool (1c).
|
|
|
- Fit the differential flange and secure it by tightening the screws to the prescribed torque. - Fit the left differential inner driveshaft. - Fit the gear selection/engagement mounting bracket and secure it using the screws. - Undo the fastenings and remove the gearbox and differential from the support tool.
- Remove the support tool from the overhaul stand and replace. - Position the gearbox and differential on the tool used for the removing-refitting from the vehicle.
|
